First experiment
1. Create & Activate your experiment using jFed
Follow these steps to activate your nodes using jFed:
- Fire up jFed, and login with the user certificate that you downloaded from the authority, and the associated password.
- If this is the first time you are using jFed to activate nodes in the iMinds portable testbed, you have to disable the proxy first. Click on Preferences, select the Proxy tab and click Run Proxy Test. Select the Never option for both Proxy for jFed and Proxy for SSH connections.
- Click on New
- Drag in 3 wireless nodes
- Select the Portable Testbed instead of the w-iLab.t testbed
- Right click, Configure Node to change the properties (name/testbed/disk image/specific node)
- Name the two fixed nodes: ap and client.
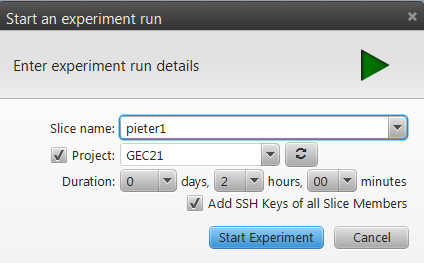
- Click Run to start your slice (Green arrow on the top left) and fill in a unique name for your slice.
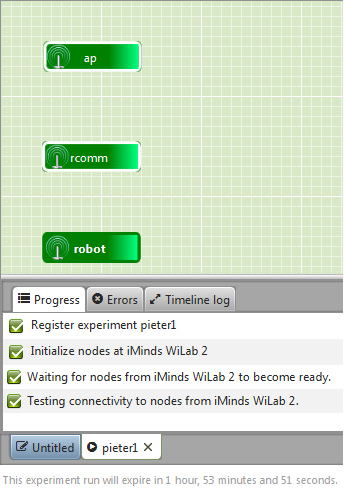
When all nodes turn green, your experiment is succesfully activated.
2. Configuration of Access Point
SSH to your AP node (double click it in jFed). Become root:
$ sudo su
Create a config file for the hostapd program:
$ nano /root/hostapd.conf
Add the following content to the config file:
interface=wlan0
driver=nl80211
country_code=BE
ssid=demoX
hw_mode=Z
channel=Y
Replace X with a random number. Replace Y with your channel(1-11 for g, 36/40/44 for a) and Z with the WiFi mode (a or g). Start hostapd. The above config will setup an AP on wlan0 using 802.11a or g, channel Y, with SSID demoX:
$ hostapd /root/hostapd.conf
Open a second ssh terminal and give an IP address to the wlan0 interface so we can test the connection to the clients (in the next steps). Be sure to replace X with your number:
$ sudo su; ifconfig wlan0 192.168.X.1/24
Running the ifconfig command should show a wlan0 and mon.wlan0 interface:

3. Configuration of client
Become root:
$ sudo su
Put the wireless interface into managed mode and specify the SSID so it knows to which AP it should connect
$ iwconfig wlan0 mode managed
$ iwconfig wlan0 essid demoX
Specify an IP address and bring up the interface:
$ ifconfig wlan0 192.168.X.10/24 up
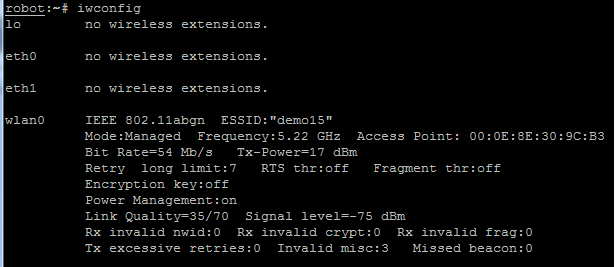
Running iwconfig should show that wlan0 is connected to an access point with your ESSID:
Check if you can ping the AP:
$ ping 192.168.X.1
4. Start the iPerf throughput measurements
Start an iPerf server instance (UDP in this case) on the AP:
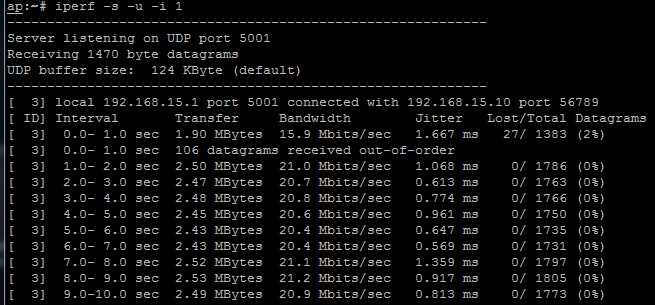
$ iperf -s -u -i 1
Configure the iPerf client:
$ iperf -u -c 192.168.X.1 -b 30M -i 1 -t 6000 &
On the server, you should see some output like below:
By tweaking the transmit power (values of 0 to 17dBm) of the access point, you should be able to see a difference in throughput of the iPerf stream (open up a new SSH session to your AP to play with the TX power):
$ iwconfig wlan0 txpower <0-17>
For this tutorial, leave the txpower set to default (17 or 20dBm) for the first experiment runs. If the effect of moving the mobile node is too limited, you can try lowering the txpower. Note that each antenna at the w-iLab.t is equipped with a 10dB attenuator (so 20dB attenuation per link).

