Using USRP X310 with RFNoC framework
This tutorial covers how to use USRP X310 with RFNoC framework. An UBUNTU 16.04 OS with UHD 4.0.0.rfnoc-devel-702-geec24d7b, GNU Radio 3.7.13.4 installed. It is possible to have a different version of these tools, however in that case please refer to the Getting started with RFNoC website for more details.
Please follow the steps below to complete an experiment.
Reserve a server of SERVER1G2X type (any server in the range of server9 to server15 is okay) and USRPx310-1 from the inventory webpage.
Define a jFed experiment using this example rspec file
usrpx310.rspec.- In this example server11 is used, you need to adapt the server to the one you reserved. To do so, double click on the server node in jFed, in the Specific node drop down list, choose the server you reserved, then un-select Only show available nodes/hardware types at the end and Click on save to save the change.
- The rspec file includes an APU-U2 node (i.e., apujtag) for later on jtag programming purpose, you may remove if you don’t need this feaature.
- The important thing is to use image urn:publicid:IDN+wilab2.ilabt.iminds.be+image+testbed:rfnoc2 on the server, in case you create your own rspec file from scratch.
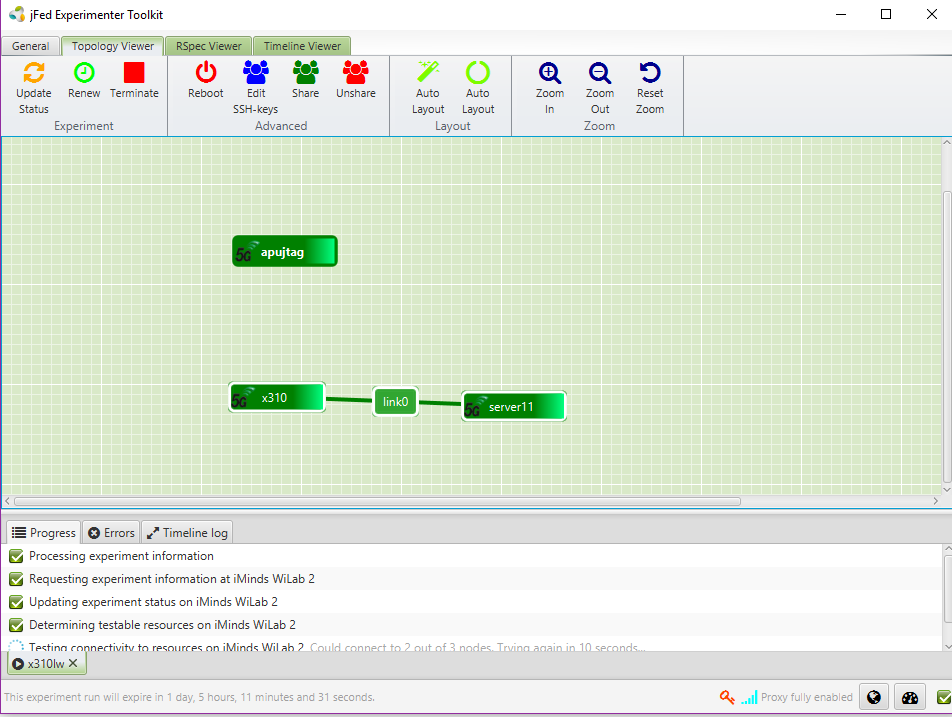
Wait for a confirmation email from testbed platform, it usually has the subject your reservation slot has started. After receiving the email, run the experiment, and wait until all nodes become ready. Ignore the red cross on “Testing connecgtivity to resources on iMinds WiLab 2”, this is because USRP is not a standard node in jFed, it does not support all the connectivity tests. A running experiment in jFed is shown in the screenshot below:
Double click on the server to log in.
After logging in, setup the rfnoc environment variable by runninng
source /rfnoc/setup_env.sh- Verify the connection between USRP and server:
run
ifconfigto observe whether you have an interface with IP address 192.168.40.1, if this is not the case, something went wrong of the link setup between USRP and server, click onreport a bugin jFed to contact the testbed adminping 192.168.40.2, check if your USRP is reachable, if not, try right click on the x310 node in jFed, and click on “reboot”, after a window pops up, click again on “reboot OS”. This will power cycle the USRP. Try ping USRP again in one minute, if it is still unreachable, report a bug in jFed.Enlarge the MTU of the 10G network interface by running
sudo ifconfig eno4 mtu 9000, please replace the interface nameeno4by the one with IP 192.168.40.1 on your machine if necessary.Enlarge the network buffer by executing the following command:
sudo sysctl -w net.core.wmem_max=576000
sudo sysctl -w net.core.rmem_max=33554432
Verify the link connection by running
uhd_usrp_probe, you should see the printout of NoC blocks in the running RFNoC image at the end of the output, such as below:| | _____________________________________________________ | | / | | | RFNoC blocks on this device: | | | | | | * DmaFIFO_0 | | | * Radio_0 | | | * Radio_1 | | | * DDC_0 | | | * DDC_1 | | | * DUC_0 | | | * DUC_1
If the command returns firmware incompatiable with the host driver, please follow the instructions of the output of the command, basically it includes first downloading the compatiable image with
uhd_images_downloaderand then reload the image usinguhd_image_loader, after the image is loaded, you need to power cycle USRP by right click on the x310 node, select reboot and then select again reboot OS. Wait for one minute and executeuhd_usrp_probeagain to verify.
Execute
gnuradio-companion, you should see a GUI window pops up, open a .grc file located in/rfnoc/src/gr-ettus/examples/rfnoc/directory. Before running the flowgraph, please make sure that the NoC blocks in the graph is contained in your FPGA image. A screenshot of the rfnoc_ddc.grc flowgraph is shown below: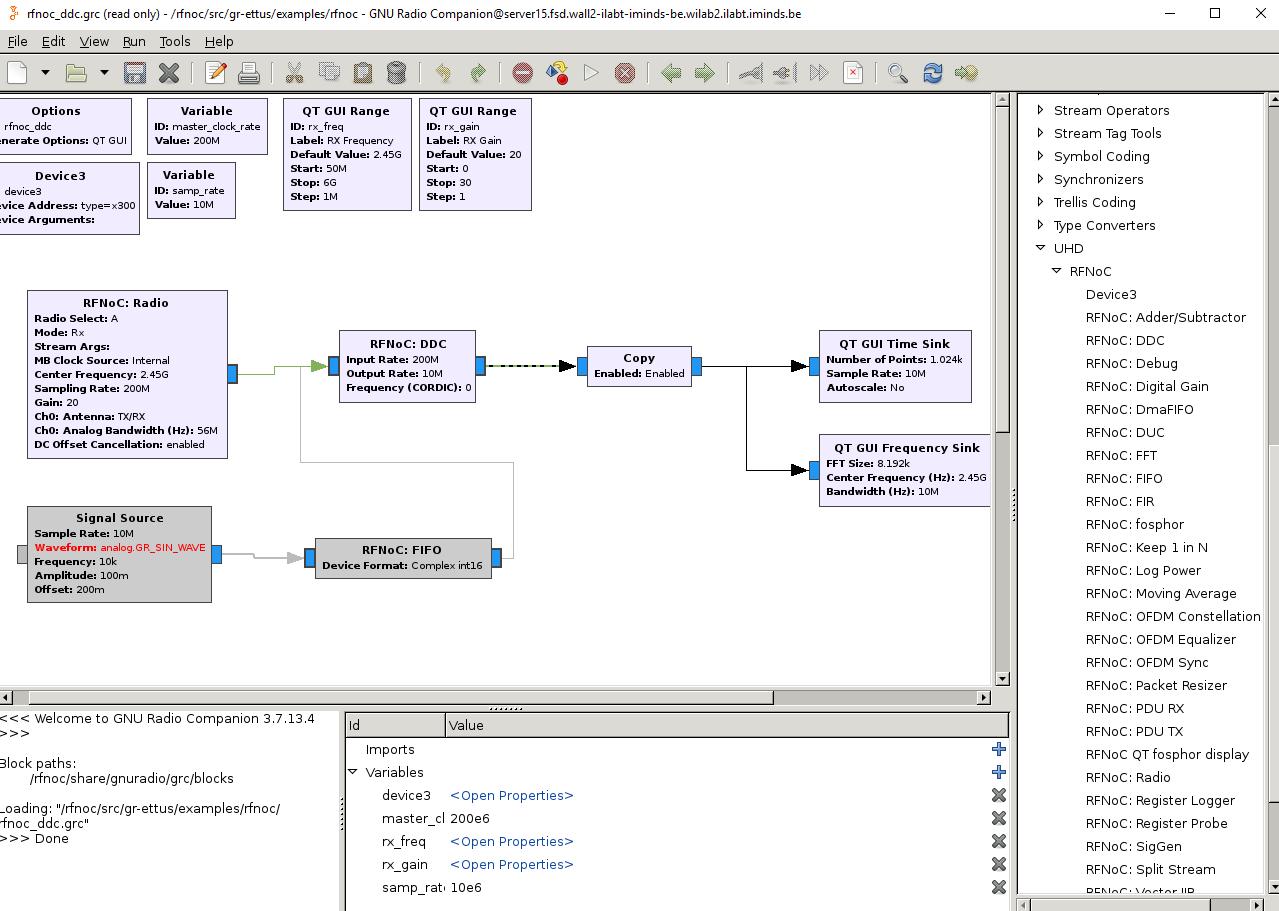
The rfnoc_ddc.grc graph contains two NoC blocks, Radio and DDC, the QT GUI Time Sink and QT GUI Frequency Sink runs on the host server. Both NoC blocks are present in the image. Run this grc flowgraph by clicking on the triangle button, you should then observe another GUI window, which displays the spectrum and time domain view of signal at the specified center frequency.
If you need to use jtag to program the USRP X310, please follow these steps:
In the ssh terminal of server, execute
sudo ifconfig intfname down. The intfname should be the one with IP address 192.168.40.1 on your server. After executing this command, you will an bring the 10G interface connected to USRP down.APU-U2 and APU-V2 are connected to USRPX310-1 and USRPX310-2 respectively, double click on the APU node corresponding to your USRP in jFed experiment GUI to log in, in the ssh terminal, execute the following:
source /share/xilinx/rfnoc/src/uhd-fpga/usrp3/top/x300/setupenv.sh --vivado-path=/share/xilinx/Vivado, this will setup necessary environemnt to do jtag programming.viv_jtag_program /path/to/your/bitstream/filename.bit, use theviv_jtag_programtool to download bit stream by specifying it as the first argument.Warning
This command takes several minutes to return, likely because it calls Vivado behind the scene which is installed on a network mounted storage, please wait till it finishes.
When it returns, you should observe output similar to the following on the terminal:
INFO: [Labtools 27-2285] Connecting to hw_server url TCP:localhost:3121
INFO: [Labtools 27-2222] Launching hw_server...
INFO: [Labtools 27-2221] Launch Output:
- Target: localhost:3121/xilinx_tcf/Digilent/251635F5C0FFA
- Device: xc7k410t_0
- Filename: /tmp/usrp_x310_fpga_RFNOC_HG.bit
After viv_jtag_program returns, go back to the server and bring the 10G Ethernet interface up by execute
sudo ifconfig intfname up, similar as before, replace intfname accordingly.Ping the USRP or use uhd_usrp_probe to test if the image is loaded correctly.
Further information
- The Xilinx Vivado Webpack 2017.4 version is installed at ls /share/xilinx/Vivado/2017.4/
- The webpack verison of Vivado will not allow you to generate FPGA images for USRP X310, so the correct way is to generate this image on your own local machine and transfer it to the server in testbed. File upload can be achieved by right click on the server, select File transfer and browse to select your image file. For the remote locateion, please choose /tmp
- If your image contains a customized NoC block, you also need to transfer the files of your OOT module that runs on the host server, and install the OOT module to gnuradio. For more details please refer to https://kb.ettus.com/Getting_Started_with_RFNoC_Development

