Using the USRP N210 devices
Setup the experiment
Via jFED
- Reserve USRP and the corresponnding servers in the inventory page, see the section Make Reservation.
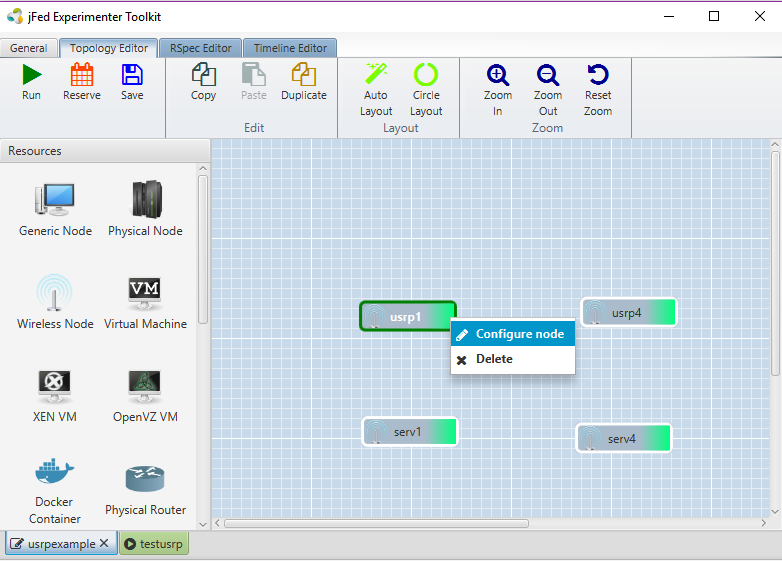
- Open jFed Experimentater Toolkit, drag and drop a few wireless nodes, right click on the node, select “configure node”, then select “specific nodes” to be usrp or server, depending on your reservation, you may give your node a unique name as identifier in this experiment.
- For the server, you also need to specify disk image, instead of selecting from the dropdown list, we recommend you to use image ID urn:publicid:IDN+wilab2.ilabt.iminds.be+image+cognitiveradio:UBU16_gnuradio3-7-9.
- Wait for a confirmation email from testbed platform, it usually has the subject your reservation slot has started. Click on the Run button to activate your experiment.
- If everything goes well you will see all nodes becomes green, ignore the error about connectivity in Progress tab, such as “Testing connectivity to resources: could connect 2 out of 4 requested nodes”, this is normal because USRPs do not support the full jFed protocol. You can now login on the servers by double click on the node in jFed Experimenter Toolkit.
- The experiment topology regarding rspec file is generated according to your topology, for instance for the experiment in screenshot below,
the
usrpn210.rspecis generated. You may load the rspec file and modify it to start another experiment in the future. For more information about activating experiments, please refer to tutorial “First Experiment”.
Via Emulab (Legacy interface)
Users of jFed may safely ignore this section and directly go to the USRP Connectivity Section
As an alternative to jFed, the legacy approach to activate an experiment is using the Emulab platform.
- First step is to reserve servers and USRP, though via Emulab reservation page
- Then you may define an experiment with NS file, an example with 1 USRP and 1 server is given below, please adapt the nodes according to your reservation by clicking on “Modify Experiment”:
# Generated by NetlabClient
set ns [new Simulator]
source tb_compat.tcl

set serv9 [$ns node]
tb-fix-node $serv9 server9

set u1 [$ns node]
tb-fix-node $u1 usrp1
$u5 add-desire USRP 1.0

$ns run
- You may click on “Swap Experiment In” to activate the experiment, an email will be sent to you to inform if the experiment is successfully swapped in.
- If everything goes well, you can now log in to the servers with the emulab account.
Checking USRP connectivity
After an experiment is activated (either via jFed or Emulab), the IP address of interface eno2 needs to be given according to the subnet of USRP, eg
sudo ifconfig eno2 192.168.10.1/24can used on the server connected to USRP1.Ping the USRP,
192.168.X0.2, where X = 1..6 depending on the USRP you are usingIf the ping succeeds, run
uhd_usrp_probeto confirm the USRP connectivity; If you cannot ping a URSP or the connectivity confirmation fails, please try to follow steps below to power cycle the USRP:Navigate to the testbed inventory page and log in.
Find the USRP you want to power cycle on the map, click on it which gives you a popup as shown in screenshot below

Click on the buttons to power cycle USRP, it is recommended to wait a few seconds after powering it off.
If the previous step is successful, run the following command to adapt the Ethernet buffer size, as recommended by UHD driver:
sudo sysctl -w net.core.wmem_max=1048576
sudo sysctl -w net.core.rmem_max=50000000
Now you are ready to use the USRP the way you want, a few applications of USRP on the w-iLabt.t is given below
Using the customized USRP sensing engine
We provide the following commandline tools to use USRP N210 as a spectrum sensing device. You may download the files and the upload them to the server either via scp or jFed tool. Please make sure all three files are in the same folder! You also need to change permision of the files to be executable.
usrpse_nonesweep: The binary that operates USRP sensing engine in continuous capturing modeusrpse_sweeping: The binary that operates USRP in sweeping modeusrpse_wrap.rb: The ruby wrapper, that calls one of the above binaries, depending on the options.
1) Usage of usrpse_wrap.rb
- Run
./usrpse_wrap.rb --help, the options are listed below, the option without default value is obligated :
Usage: usrpse_wrap [options]
    -g, --gain GAIN                  RFGain, default 30 dB
    -s, --spb SPB                    SamplePerBuffer Default 16777216 for channel occupation mode, else 4194304
    -n, --fftsize N                  FFTsize, default 512
    -a, --args Addr                  The USRP IP address
    -k, --first_channel FIRSTCHANNEL FirstChannel, required for channel occupation mode, else ignored
    -m, --detector_mode MODE         Detector, allowed values: 0 Channel occupation, 1 Avg, 2 Max, 3 Min, default 1
    -d, --se_mode STANDARD           Standard, allowed values: WLAN_G, ZIGBEE, BLUETOOTH
The output of the USRP sensing engine is in CSV format, the first column is unix timestamp in us, second column is the USRP ID, the 3rd to last columns contain the measurements of the specified channels. The USRP sensing engine can do two types of measurement, either measure the signal strength of a particular sets of channels in dBm, or measure the duty cycle of a channel in %.
- For the measurement in dBm, there are again 3 sub modes, maxhold, minhold or average, by default the detector does
averaging. To change detector mode, you need to use the
detector_modeoption. The measurement of signal strength always covers all channels in the 2.4 GHz ISM band. - For selecting the
dutycyclemode, you need to assign0to thedetector_modeoption. You also need to specify a range of channels you want to measure. This is done via thefirst_channeloption. When the first channel is selected, the sensing engine automatically measures all channels covered within 25 MHz, as this is the maximum sample rate allowed by USRP. In this mode, the sensing engine reports how much percent of the time the measured energy is above -70 dBm.
- For the measurement in dBm, there are again 3 sub modes, maxhold, minhold or average, by default the detector does
averaging. To change detector mode, you need to use the
You always need to specify what kind of channel, eg Wi-Fi or Zigbee, that you want to measure, this is specified via the
se_modeoption.- A few examples are listed below. The IP of USRP in the examples is written as “192.168.X0.2”, you need to replace the IP:
./usrpse_wrap.rb --se_mode WLAN_G --args 192.168.X0.2Executes the sensing engine to measure RSSI of all channels in 802.11g standard in averaging mode, the unit is “dBm”../usrpse_wrap.rb --se_mode WLAN_G --args 192.168.X0.2 --detector_mode 2Executes the sensing engine to measure the RSSI of all channels in 802.11g standard in maxhold mode, the unit is “dBm”../usrpse_wrap.rb --se_mode WLAN_G --args 192.168.X0.2 --detector_mode 0 --first_channel 2Executes the sensing engine to measure the duty cycle of channel 2 in 802.11g standard, unit is “%”../usrpse_wrap.rb --se_mode ZIGBEE --args 192.168.X0.2 --detector_mode 0 --first_channel 13Executes the sensing engine to measure the duty cycle of channel 13, 14, 15,16 in Zigbee standard, the unit is “%”.
2) Usage of usrpse binaries
Run
./usrpse_nonesweeping --help, or./usrpse_sweeping --help, this will give you a list of options to run the binary without ruby wrapper, directly calling the binary allows you to sense any channel of any bandwidth in the supported RF range by XCVR 2450 daughterboardRun
./usrpse_nonesweeping, or./usrpse_sweeping, when no option is given, an example command will be print out, eg:lwei@serv1:~/usrpse$ ./usrpse_nonesweep linux; GNU C++ version 5.3.1 20151219; Boost_105800; UHD_003.009.002-0-unknown ./usrpse_nonesweep Version 2.1 ./usrpse_nonesweep --help for usage
Usage example:
./usrpse_nonesweep --freq 2432000000 --rate 25000000 --gain 30 --spb 16777216 --fftsize 512 --numofchannel 4 --firstchannel 2425000000 --channelwidth 5000000 --channeloffset 5000000 --threshold -70 --args addr=192.168.10.2 --mode 0 --file whatever.txt
Using the USRP with GNU Radio Companion
When running an image with GNU Radio installed, you may log into the server with -X option, this allows graphical
interface to be forwarded to your local PC.
Run
gnuradio-companion, a GNURadio GUI will pop up, you may drag and drop blocks and build your flowgraphHowever when you click on the triangle to run the graph, you may see the following error:

This is not a severe error, click on OK and your flow graph will continue to run, if it is not the case, try restart the gnuradio companion.

