Managing multiple sensors with OpenTestbed
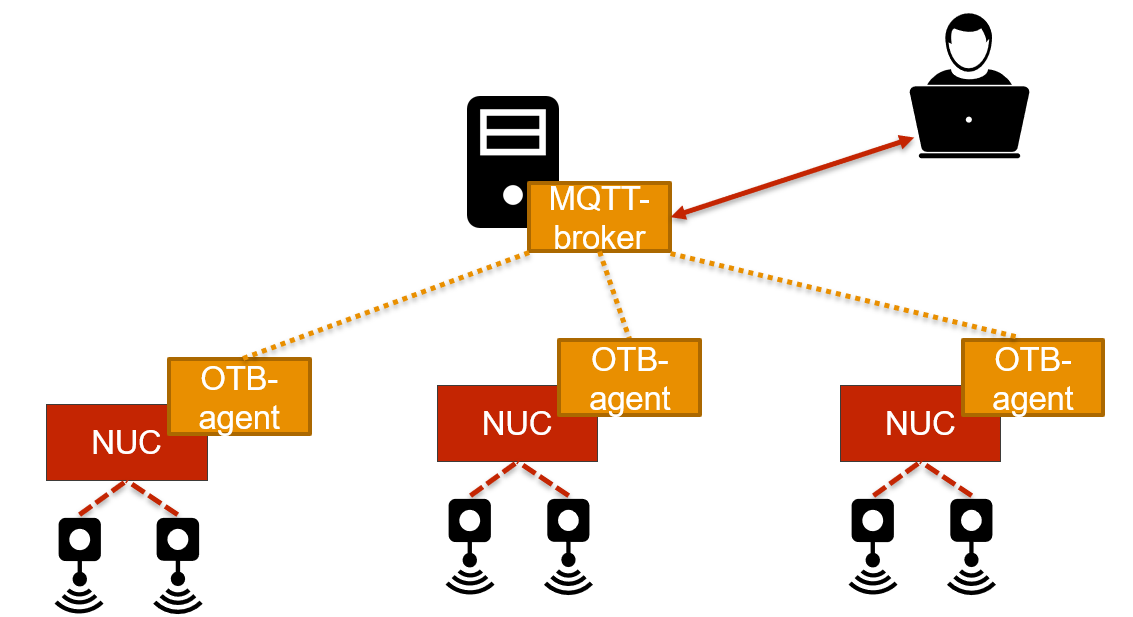
OpenTestbed allows you to manage multiple sensors, spread over multiple devices via an MQTT-server. It was initially developed at Inria, and has subsequently been adapted for use on w-iLab.1 .
It supports:
- automatic discovery of all available sensor motes;
- flashing a firmware (from a URL or from a file);
- sending serial data to one or more motes simultaneously;
- listening to the serial data sent by the motes.
OpenTestbed can be controlled either by directly sending messages on the MQTT-bus, using Inria’s WebGUI or imec’s CLI.
Installation
Installation with ESpec
An ESpec has been developed to deploy OpenTestbed on one or more nodes. It can be obtained from the espec_minimal branch of OpenTestbed .
To use it:
- Reserve the sensor nodes you want to use
- Adapt the RSpec located in
deployment/otb.rspecto refer to your reserved sensor nodes. Make sure that<jfed:ansible_group name="sensor"/>is mentioned under<node>. - Once your reservation has started, swap in the resources with the ESpec. In jFed: click Open ESpec, select the folder with your adapted ESpec and start the experiment.
- Wait for the resources to be swapped in, and the software to be installed via Ansible.
Manual installation
When manually installing the OpenTestbed-software, you must deploy at least 2 components:
- An MQTT-server for brokering all OpenTestbed-messages (for example: Eclipse Mosquitto);
- The
otbox-software on each sensor-enabled server; - Optional: A node-red dashboard which provides a WebGUI to control your OpenTestbed instance
You can manually deploy the OpenTestbed otbox-software by:
Download or Clone the OpenTestbed repository on each server you want to add to your OpenTestbed-instance
Install the Python-requirements with
pip install -r install/requirements.txt. Please note that most other files in the install/-folder are specific for the Inria-setup, and should be disregarded.Run the
otbox.py-script as follows:python otbox.py --testbed wilab --broker <ip-or-dns-name-of-mqtt-server>
Using OpenTestbed
OpenTestbed is controlled by MQTT-messages. These are defined in the README.md of the OpenTestbed-repo.
You can implement these messages directly into your software, or you can use the CLI or WebGUI described in the sections below.
Using OpenTestbed via the CLI
imec developed a simple CLI to send OpenTestbed-commands and receive the responses. It is available as cli.py.
$ python cli.py
Usage: cli.py [OPTIONS] COMMAND [ARGS]...

Options:
  --help  Show this message and exit.

Commands:
  changelocation     Change location of otbox
  discovermotes      Discover motes connected to otboxes
  echo               Simple echo command
  listenserial       Listen to the output of mote with the given EUI64
  program-from-file  Flash firmware from local file
  program-from-url   Flash firmware from URL
  status             Request status of otboxes
  tomoteserialbytes  Send data to serial port of mote
All commands require the testbed and broker-address to be specified, otherwise it will default to the Inria-testbed. This can be done either by passing them as options or as environment variables.
Important
For use in w-iLab.1 the testbed argument always must be wilab
As arguments:
- -t or –testbed for the testbed. This must always be `wilab` for usage in w-iLab.1.
- -b or –broker for the broker IP or DNS name.
As environment variables:
export OTB_TESTBED="wilab"export OTB_BROKER="<ip-or-dns-name-of-mqtt-broker>"
All commands of cli.py will keep listening for replies until CTRL+C is pressed.
Example:
$ export OTB_BROKER="server.otb.wall2-ilabt-iminds-be.wall2.ilabt.iminds.be"
$ export OTB_TESTBED="wilab"
$ python cli.py --help
  Usage: cli.py [OPTIONS] COMMAND [ARGS]...

  Options:
    -t, --testbed [iotlab|opentestbed|wilab]
                                    [required]
    -b, --broker TEXT               The MQTT broker address  [required]
    -v, --verbose                   Increase verbosity
    --help                          Show this message and exit.

  Commands:
    changelocation     Change location of otbox
    discovermotes      Discover motes connected to otboxes
    echo               Simple echo command
    listenserial       Listen to the output of mote with the given EUI64
    program-from-file  Flash firmware from local file
    program-from-url   Flash firmware from URL
    status             Request status of otboxes
    tomoteserialbytes  Send data to serial port of mote

$ python cli.py echo "Hello World!"
b    sensor2: {u'token': u'2b4h7g3mn400', u'payload': u'Hello World!'}
b    sensor1: {u'token': u'2b4h7g3mn400', u'payload': u'Hello World!'}
^C

$ python cli.py discovermotes
b    sensor2: {u'motes': [{u'firmware_description': u'FIRMWARE_EUI64_RETRIEVAL',
u'bootload_success': False, u'serialport': u'/dev/ttyUSB0'},
{u'firmware_description': u'FIRMWARE_EUI64_RETRIEVAL',
u'EUI64': u'00-12-4b-00-09-df-2c-0f', u'bootload_success': True, u'serialport': u'/dev/ttyUSB1'}]}
b    sensor1: {u'motes': [{u'firmware_description': u'FIRMWARE_EUI64_RETRIEVAL',
u'bootload_success': False, u'serialport': u'/dev/ttyUSB0'},
{u'firmware_description': u'FIRMWARE_EUI64_RETRIEVAL',
u'EUI64': u'00-12-4b-00-09-df-8e-af', u'bootload_success': True, u'serialport': u'/dev/ttyUSB1'}]}
^C
To upload a firmware to the motes, use the program-from-file command. Every sensor will respond with its unique
EUI64-identifier, and the result:
$ python cli.py program-from-file ~/contiki-ng/examples/hello-world/build/zoul/remote-revb/hello-world.hex
m 00-12-4b-00-09-df-90-95: True
m 00-12-4b-00-09-df-2c-2c: True
m 00-12-4b-00-10-03-56-2f: True
m 00-12-4b-00-10-03-54-44: True
To listen to the serial output of a mote, use listenserial, which expects the EUI64-identifier of the mote which
serial output you want to follow:
$ python /opt/opentestbed/cli.py listenserial 00-12-4b-00-09-df-90-95
Hello, world
Hello, world
Hello, world
^C
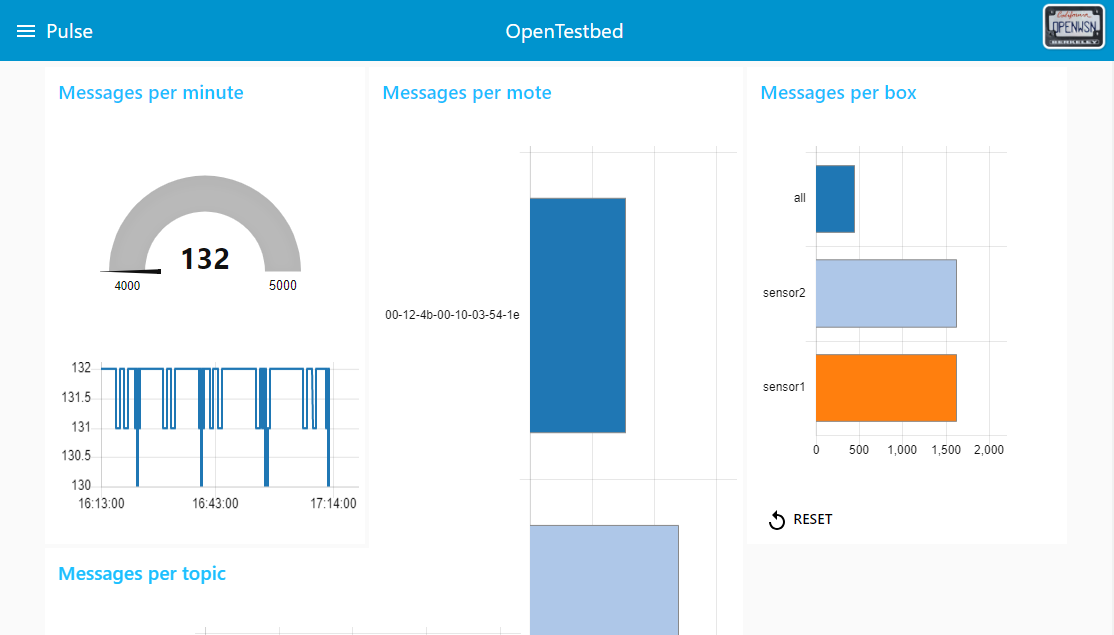
Using OpenTestbed via the WebGUI
The WebGUI is available on port 80 of the server-node. The dashboard shows you how many messages are being sent, which boxes (=servers) and motes (by EUI64-address) are sending messages, and what the topics of these messages are.
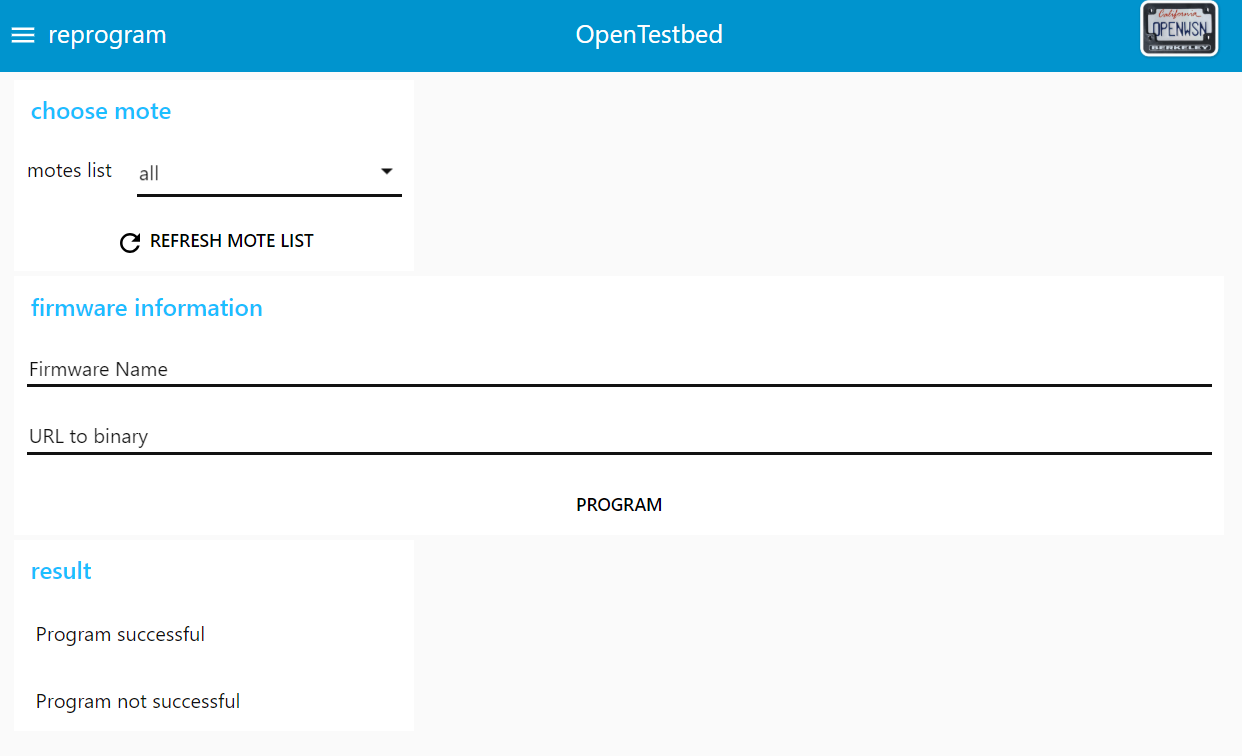
To change the firmware go to ‘reprogram’ in the menu. You can select the mote from a dropdown-list, and must provide the hex-file with your firmware as an URL.
Troubleshooting
When the upload to a sensor fails, you can use the following files on the sensor-node to diagnose the problem:
/opt/opentestbed/log_ttyUSB0.txtcontains the output of the latest flash-command- The
otbox-std[out,err]---supervisor-[XXXXXX].logfiles in/var/log/supervisor/

