OpenStack on the Virtual Wall
This tutorial will show you how to create a small OpenStack-cloud running on bare-metal Virtual Wall machines. You will have full administrative access to these machines, which means that you can fully customize the setup.
Introduction
In this tutorial we will use EnOS to setup OpenStack. EnOS targets reproducible experiments which allows easy deployment, customization and benchmarking of an OpenStack instance.
For the deployment of OpenStack, it uses Kolla-Ansible, which deploys the various OpenStack-components in Docker-containers.
EnOS differentiates between 3 types of host machines:
- control: runs the OpenStack Dashboard (Horizon) and other administrative components like APIs and databases.
- compute: hosts the VM’s that are deployed on the OpenStack instance
- network: hosts the Neutron-network agents along with haproxy/keepalived.
In this tutorial we will deploy an experiment which deploys one node of each. We will connect these nodes over two dedicated network links: one private network - for the internal communication between the different OpenStack-components - and one public network - where traffic to/from the public internet is sent. To provide an isolated environment for your experiments, the public network is not directly connected to the public internet, but through a NAT: this still allows for outgoing internet connectivity, but limits interference from outside when performing measurements.
Setup
We provide an ESpec to setup OpenStack via EnOS, which is available on https://gitlab.ilabt.imec.be/ilabt/enos-espec/ . You can instantiate an instance of this ESpec via jFed.
While the experiment is swapping in, let’s have a look to the architecture:
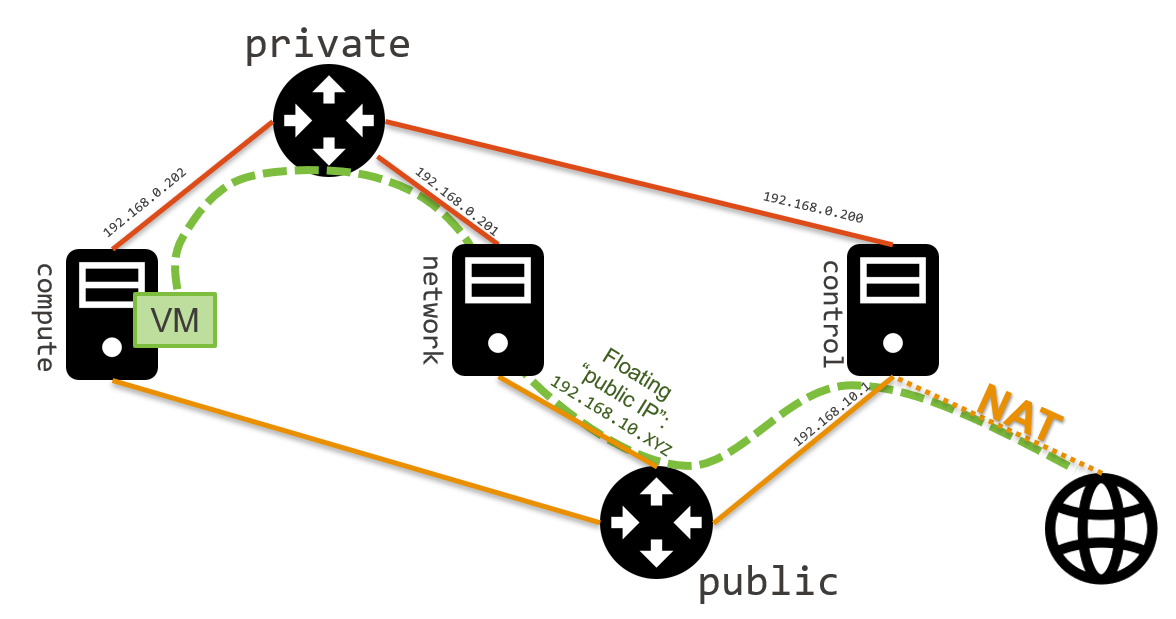
The testbed-link with the 192.168.0.0 subnet will be used as the private network for the OpenStack components.
The testbed-link with the 192.168.10.0 subnet will be used as the public network for the OpenStack VM’s. When assigning a floating IP from the public-subnet to a VM, all traffic from that VM to the public internet will be pushed to that testbed-link.
The public-subnet of the public network in OpenStack is configured to hand out addresses between 192.168.10.2 and 192.168.10.199. The gateway for this network is 192.168.10.1 which is assigned to the network interface of node0 which is connected to this testbed-link. node0 is configured by deployment/setup-os-nat.py to forward all traffic from this interface to the interface of the control network (which has access to the public internet). This also allows you to directly ping to OpenStack Server-instances with a “floating ip” attached to them on that node.
Note
enos automatically removes the IP-addresses assigned to the public network interfaces when starting. The IP-addresses mentioned in the RSpec for this testbed link (192.168.10.200, 192.168.10.201, etc) are thus not longer available after the ESpec has finished running.
Tip
If you want to have access to OpenStack Servers with a “floating ip” from another machine in your experiment, you can add a route to the 192.168.10.0/24 subnet via the eth-interface corresponding to the public link.
- Find the interface which is UP but has no IP-address attached to it:
root@node1:/users/twalcari# ip addr
...
3: enp1s0f1: <BROADCAST,MULTICAST> mtu 1500 qdisc mq state DOWN group default qlen 1000
    link/ether 00:25:90:4c:73:8b brd ff:ff:ff:ff:ff:ff
4: enp8s0f0: <BROADCAST,MULTICAST,UP,LOWER_UP> mtu 1500 qdisc mq state UP group default qlen 1000
    link/ether 00:25:90:65:be:70 brd ff:ff:ff:ff:ff:ff
5: enp8s0f1: <BROADCAST,MULTICAST,UP,LOWER_UP> mtu 1500 qdisc mq state UP group default qlen 1000
    link/ether 00:25:90:65:be:71 brd ff:ff:ff:ff:ff:ff
    inet 192.168.0.201/24 brd 192.168.0.255 scope global enp8s0f1
       valid_lft forever preferred_lft forever
...
We can see that enp8s0f0 is UP but has no IP-addresses.
- We now add the route:
root@node1:/users/twalcari# ip route add 192.168.10.0/24 dev enp8s0f0
- We can now ping floating ips:
root@node1:/users/twalcari# ping 192.168.10.14
PING 192.168.10.14 (192.168.10.14) 56(84) bytes of data.
64 bytes from 192.168.10.14: icmp_seq=1 ttl=62 time=3.50 ms
64 bytes from 192.168.10.14: icmp_seq=2 ttl=62 time=0.836 ms
^C
--- 192.168.10.14 ping statistics ---
2 packets transmitted, 2 received, 0% packet loss, time 1001ms
rtt min/avg/max/mdev = 0.836/2.169/3.503/1.334 ms
Using OpenStack Web interface
The webinterface is available on port 80 of any control-node in your enos-deployment. You can find the first address as follows:
twalcari@node0:~$ cd /opt/enos
twalcari@node0:/opt/enos$ sudo su
root@node0:/opt/enos# source venv/bin/activate
(venv) root@node0:/opt/enos# enos info --out json | jq -r '.rsc.control[0].address'
/opt/enos/venv/lib/python3.5/site-packages/enoslib/task.py:99: YAMLLoadWarning: calling yaml.load() without Loader=... is deprecated, as the default Loader is unsafe. Please read https://msg.pyyaml.org/load for full details.
  env.update(yaml.load(f))
/opt/enos/venv/lib/python3.5/site-packages/enoslib/task.py:106: YAMLLoadWarning: calling yaml.load() without Loader=... is deprecated, as the default Loader is unsafe. Please read https://msg.pyyaml.org/load for full details.
  env["config"].update(yaml.load(f))
INFO:enoslib.task:- Task info started -
INFO:enoslib.task:- Task info finished -
192.168.0.11
Now setup an SSH-tunnel to this IP-address on port 80 to get the OpenStack Horizon-webinterface. You can login with
- login: admin
- password: demo
From here, you can reach Project > Compute > Instances > Launch Instance and boot a virtual machine given the following information:
- a name (e.g., horizon-vm)
- an image (e.g., cirros)
- a flavor to limit the resources of your instance (I recommend tiny)
- and a network setting (must be private)
You should select options by clicking on the arrow on the right of each possibility. When the configuration is OK, the Launch Instance button should be enabled. After clicking on it, you should see the instance in the Active state in less than a minute.
Now, you have several options to connect to your freshly deployed VM. For instance, by clicking on its name, Horizon provides a virtual console under the Console tab. Use the following credentials to access the VM:
- login: cirros
- password: cubswin:)
Using OpenStack CLI
After the deployment has finished you can start using the openstack-cli via:
$ cd /opt/enos
$ source venv/bin/activate # activates the Python Virtual Environment containing the openstack-cli
$ source ./enos_<TIMESTAMP>/admin-openrc
You can then use the openstack-cli as you wish.
twalcari@node0:~$ cd /opt/enos
twalcari@node0:/opt/enos$ source venv/bin/activate
(venv) twalcari@node0:/opt/enos$ source enos_2019-04-16T07\:55\:01.912820/admin-openrc
(venv) twalcari@node0:/opt/enos$ openstack image list
+--------------------------------------+------------+--------+
| ID                                   | Name       | Status |
+--------------------------------------+------------+--------+
| 3d1b856d-c450-489e-b825-3eb6dcba2b21 | cirros.uec | active |
| 1e180920-59c2-4777-ba03-4cef51196c4d | debian-9   | active |
+--------------------------------------+------------+--------+

(venv) twalcari@node0:/opt/enos$ openstack server create --image cirros.uec\
>                         --flavor m1.tiny\
>                         --network private \
>                         cli-vm
+-------------------------------------+---------------------------------------------------+
| Field                               | Value                                             |
+-------------------------------------+---------------------------------------------------+
| OS-DCF:diskConfig                   | MANUAL                                            |
| OS-EXT-AZ:availability_zone         |                                                   |
| OS-EXT-SRV-ATTR:host                | None                                              |
| OS-EXT-SRV-ATTR:hypervisor_hostname | None                                              |
| OS-EXT-SRV-ATTR:instance_name       |                                                   |
| OS-EXT-STS:power_state              | NOSTATE                                           |
| OS-EXT-STS:task_state               | scheduling                                        |
| OS-EXT-STS:vm_state                 | building                                          |
| OS-SRV-USG:launched_at              | None                                              |
| OS-SRV-USG:terminated_at            | None                                              |
| accessIPv4                          |                                                   |
| accessIPv6                          |                                                   |
| addresses                           |                                                   |
| adminPass                           | xUBAmaure9rn                                      |
| config_drive                        |                                                   |
| created                             | 2019-04-16T15:12:54Z                              |
| flavor                              | m1.tiny (be51949c-b42a-44c1-8eba-c7a26ce607c7)    |
| hostId                              |                                                   |
| id                                  | 5484ae05-750d-4c30-a941-551c33cdbd25              |
| image                               | cirros.uec (3d1b856d-c450-489e-b825-3eb6dcba2b21) |
| key_name                            | None                                              |
| name                                | cli-vm                                            |
| progress                            | 0                                                 |
| project_id                          | d155f50e69f04eddb7973d0865a85b9c                  |
| properties                          |                                                   |
| security_groups                     | name='default'                                    |
| status                              | BUILD                                             |
| updated                             | 2019-04-16T15:13:00Z                              |
| user_id                             | 1e2ac091438749ef8b097627c0ee2eea                  |
| volumes_attached                    |                                                   |
+-------------------------------------+---------------------------------------------------+
After waiting 2 minutes the VM goes from BUILD (=OpenStack is allocating the vm) to ACTIVE:
(venv) twalcari@node0:/opt/enos$ openstack server show cli-vm
+-------------------------------------+-----------------------------------------------------------+
| Field                               | Value                                                     |
+-------------------------------------+-----------------------------------------------------------+
| OS-DCF:diskConfig                   | MANUAL                                                    |
| OS-EXT-AZ:availability_zone         | nova                                                      |
| OS-EXT-SRV-ATTR:host                | node2.twenos6.wall2-ilabt-iminds-be.wall1.ilabt.iminds.be |
| OS-EXT-SRV-ATTR:hypervisor_hostname | node2.twenos6.wall2-ilabt-iminds-be.wall1.ilabt.iminds.be |
| OS-EXT-SRV-ATTR:instance_name       | instance-00000001                                         |
| OS-EXT-STS:power_state              | Running                                                   |
| OS-EXT-STS:task_state               | None                                                      |
| OS-EXT-STS:vm_state                 | active                                                    |
| OS-SRV-USG:launched_at              | 2019-04-16T15:14:37.000000                                |
| OS-SRV-USG:terminated_at            | None                                                      |
| accessIPv4                          |                                                           |
| accessIPv6                          |                                                           |
| addresses                           | private=10.0.0.14                                         |
| config_drive                        |                                                           |
| created                             | 2019-04-16T15:12:54Z                                      |
| flavor                              | m1.tiny (be51949c-b42a-44c1-8eba-c7a26ce607c7)            |
| hostId                              | 01b02ae4c87042f8f7ce7266a41dc253d911b3771c4e0000da92b4e0  |
| id                                  | 5484ae05-750d-4c30-a941-551c33cdbd25                      |
| image                               | cirros.uec (3d1b856d-c450-489e-b825-3eb6dcba2b21)         |
| key_name                            | None                                                      |
| name                                | cli-vm                                                    |
| progress                            | 0                                                         |
| project_id                          | d155f50e69f04eddb7973d0865a85b9c                          |
| properties                          |                                                           |
| security_groups                     | name='default'                                            |
| status                              | ACTIVE                                                    |
| updated                             | 2019-04-16T15:14:38Z                                      |
| user_id                             | 1e2ac091438749ef8b097627c0ee2eea                          |
| volumes_attached                    |                                                           |
+-------------------------------------+-----------------------------------------------------------+
Now we make the vm accessible with a ‘public ip’:
(venv) twalcari@node0:/opt/enos$ openstack server add floating ip\
>   cli-vm\
>   $(openstack floating ip create public -c floating_ip_address -f value)
Extra Resources
- For more info on the network-side of the OpenStack-deployment via enos (which uses Kolla): OpenStack,Ansible and Kolla on Ubuntu 16.04
- EnOS tutorial from another testbed, useful for learning about the other features of enos like introducing delay, running tests with rally, etc: EnOS Tutorial on top of Grid‘5000

