Disk images
By default, a fresh Ubuntu 14.04 installation is installed when you request a new node. If this doesn’t meet your needs, you can choose another OS to be installed. It is also possible to create disk images of a running server, which can then be reused in a new experiment.
Choosing another OS
The Virtual Wall provides several disk images with alternative OS’es that can be used.
Ubuntu:
- Ubuntu 18:
urn:publicid:IDN+wall2.ilabt.iminds.be+image+emulab-ops:UBUNTU18-64-STD - Ubuntu 16:
urn:publicid:IDN+wall2.ilabt.iminds.be+image+emulab-ops:UBUNTU16-64-STD - Ubuntu 14:
urn:publicid:IDN+wall2.ilabt.iminds.be+image+emulab-ops:UBUNTU14-64-STD - Ubuntu 12:
urn:publicid:IDN+wall2.ilabt.iminds.be+image+emulab-ops:UBUNTU12-64-STD
Debian:
- Debian 7.7:
urn:publicid:IDN+wall2.ilabt.iminds.be+image+emulab-ops:DEB77-64-STD - Debian 6 with vlan-patched kernel version 3.9.6:
urn:publicid:IDN+wall2.ilabt.iminds.be+image+emulab-ops:DEB60_64-VLAN
Other Unix:
- CentOS 6.5:
urn:publicid:IDN+wall2.ilabt.iminds.be+image+emulab-ops:CENTOS65-64-STD-BIG2 - CentOS 6.3:
urn:publicid:IDN+wall2.ilabt.iminds.be+image+emulab-ops:CENTOS63-64-STD - FreeBSD 8.3:
urn:publicid:IDN+wall2.ilabt.iminds.be+image+emulab-ops:FBSD83-STD - Fedora 15:
urn:publicid:IDN+wall2.ilabt.iminds.be+image+emulab-ops:FEDORA15-64-STD
Windows:
- Windows 7:
urn:publicid:IDN+wall2.ilabt.iminds.be+image+emulab-ops:WIN7SP1-STD
Note
It takes about 20 minutes to swap in a Windows 7 node. See windows_access on howto login.
Note
The legacy Debian 6, Ubuntu 12, CentOS 6.3 and older have only about 6GB root filesystem, which may be limiting when you install a lot of software yourself.
Consult Local storage per node to alleviate this.
It is also possible to specify an image from another Emulab/InstaGENI installation, which will then automatically be transferred to the Virtual Wall. This can be achieved by using an Image Metadata URL, like the following for an Debian 7.6 image:
https://www.wall2.ilabt.iminds.be/image_metadata.php?uuid=dd795c55-0a8b-11e4-b407-001517becdc1
One caveat though: this will work automatically when you deploy XEN VMs, but for raw pcs, the local testbed administrator has to confirm the hardware types on which this image is supported.
Specifying a disk image in jFed
TODO
Specifying a disk image in an RSpec
To manually specify the disk image in an RSpec, you have to add the disk_image tag to the sliver_type tag:
<?xml version="1.0" encoding="UTF-8" standalone="yes"?>
<rspec generated="2014-02-01T16:47:22.736+01:00" generated_by="Experimental jFed Rspec Editor" type="request" xsi:schemaLocation="http://www.geni.net/resources/rspec/3 http://www.geni.net/resources/rspec/3/request.xsd http://www.protogeni.net/resources/rspec/ext/delay/1 http://www.protogeni.net/resources/rspec/ext/delay/1/request.xsd" xmlns="http://www.geni.net/resources/rspec/3" xmlns:delay="http://www.protogeni.net/resources/rspec/ext/delay/1" xmlns:xsi="http://www.w3.org/2001/XMLSchema-instance" >
  <node client_id="node0" component_manager_id="urn:publicid:IDN+wall2.ilabt.iminds.be+authority+cm" exclusive="true">
     <sliver_type name="raw-pc">
        <disk_image name="urn:publicid:IDN+wall2.ilabt.iminds.be+image+emulab-ops:DEB76-64-STD"/>
     </sliver_type>
  </node>
</rspec>
When using an Image Metadata URL, write:
<disk_image name="https://www.wall2.ilabt.iminds.be/image_metadata.php?uuid=dd795c55-0a8b-11e4-b407-001517becdc1"/>
Create your own disk image
You can use e.g. the jFed tool to create a new image as follows. Suppose you have set up an experiment and installed some software, and want to create an image of a specific node.
In jFed you right click the node, and chose Create image. You will see the dialog box to chose an image name:
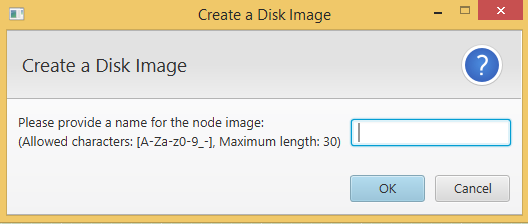
Chose a name for your image, and you will see the next pop-up informing you how to use this image in a new experiment:
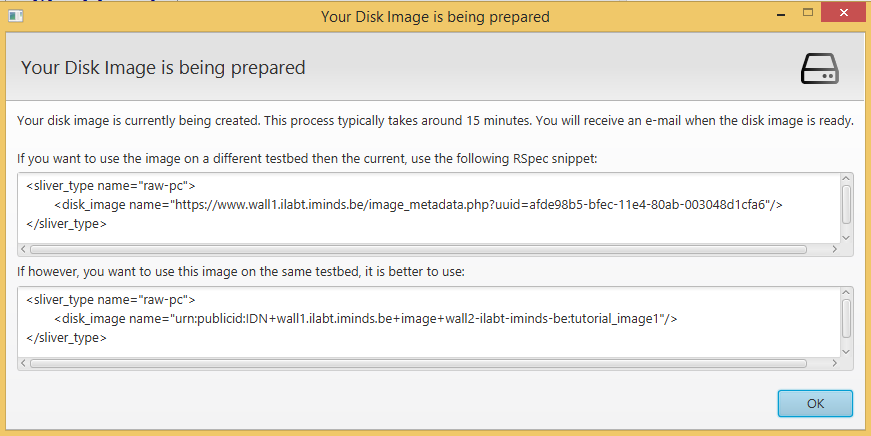
Now, the testbed will reboot your node and take an image (which may take about 10 minutes). You receive an email when the image is ready (containing also the above unique IDs).
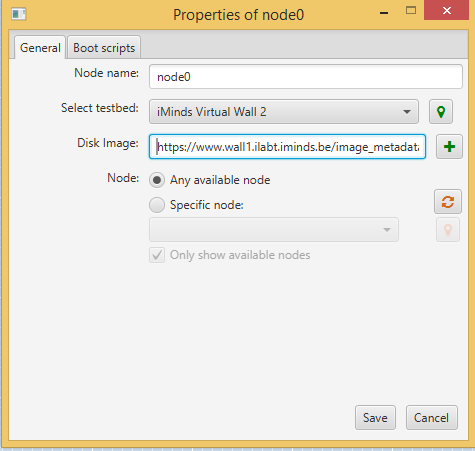
If you use jFed, in your new experiment, you just put the image URL (works on all virtual wall, instageni, emulab testbeds, the image is fetched automatically from another testbed if needed) or image URN (only the same testbed where you created your image) in the image field when configuring a node:
Caveat: system users
There is a caveat when you install software which creates system users (e.g. mysql or postgres user, etc). The testbed refreshes the passwd file when installing a new node, so your users will be overwritten.
To prevent this, do the following on your node prior to taking an image:
sudo su
/usr/testbed/lib/prepare -M
Caveat: new OS
The above starts always from an existing image (containing the testbed tools already). If you would however need a new operating system image not yet listed, then contact the testbed admins to discuss (vwall-ops@atlantis.ugent.be).
Testbed admins can refer to Creating an emulab image from scratch. (this is not trivial)

