Configuration
Docker Image
JupyterHub must be started with a Jupyter Docker Stacks image, or a descendant from it.
Jupyter Docker Stacks provides a wide array of Jupyter Notebooks to get you started:
- jupyter/base-notebook
- jupyter/minimal-notebook
- jupyter/r-notebook
- jupyter/scipy-notebook
- jupyter/tensorflow-notebook
- jupyter/datascience-notebook
- jupyter/pyspark-notebook
- jupyter/all-spark-notebook
You can also look into the Community Stacks images provided by the Jupyter community for other specialized images (with amongst others support for C#, Java, Haskell, SAGE, Kotlin, …)

The official Jupyter Docker Stacks are however NOT GPU-enabled. For your convenience we created a fork of the public Jupyter Docker
Stacks with GPU-processing capability. These images use nvidia/cuda as base image instead of a vanilla Ubuntu.
You can use these images by changing the prefix from jupyter/ to
gitlab.ilabt.imec.be:4567/ilabt/gpu-docker-stacks/.
For example: a Jupyter notebook with the GPU-enabled Tensorflow and Keras-library can be found under
gitlab.ilabt.imec.be:4567/ilabt/gpu-docker-stacks/tensorflow-notebook:latest.
Adding custom software
JupyterHub supports all Docker images which descend from the Jupyter Docker Stacks
You can add additional software by creating a docker image which starts from an existing Jupyter Docker Stacks-image, and which executes the necessary installation commands. Check the section Using pip install or conda install in a Child Docker image of the Jupyter Docker Stacks documentation for a full example.
- If you want to use GPU’s, you’ll need to descend your image from a GPU-enabled image. These are available at
- iLab.t GPU Docker Stacks Container Registry.
For example, to add a library to the GPU-enabled tensorflow-notebook, you can use the following Dockerfile:
# Start from a core gpu-enabled stack version
FROM gitlab.ilabt.imec.be:4567/ilabt/gpu-docker-stacks/tensorflow-notebook:latest

#######################################
## Installing Extra software via apt ##
#######################################

# Apt requires root permissions, so switch to root
USER root
# Install dependencies
RUN apt-get update && \
    apt-get install \
    graphviz \
    libgraphviz-dev \
    libcgraph6 && \
    apt-get clean && \
    rm -rf /var/lib/apt/lists/*

# Install spektral in the default python3 environment
RUN pip install spektral

# Restore the correct user
USER jovyan


#########################################
## Installing Extra software via conda ##
#########################################

# Installation should be done as the jovyan user, so don't switch to root

# mamba == conda, but faster
RUN mamba install --quiet --yes \
    'beautifulsoup4' && \
    mamba clean --all -f -y && \
    fix-permissions "/opt/conda" && \
    fix-permissions "/home/jovyan"
- After building this image, upload it to a Docker Registry with docker push. You can use any docker internet-accessible
- Docker registry, however, we advice you to use the private Docker Registry available via gitlab.ilabt.imec.be.
See image for more info.
For example to build and push this Dockerfile to the public GPULab Docker Registry:
docker build -t gitlab.ilabt.imec.be:4567/myusername/myprojectname/spektral:v1 .
docker push gitlab.ilabt.imec.be:4567/myusername/myprojectname/spektral:v1
Once pushed to the registry, you can start your custom Jupyter Docker Image by specifying the full registry path in the
field image. In this example: gitlab.ilabt.imec.be:4567/myusername/myprojectname/spektral:v1.
Exposing Ports
When you have a specialized tool like Tensorboard, RStudio, Shiny, etc. that has a user interface that runs in the browser, there is a good chance that you can also run it alongside your notebook.
When you want to access processes that run alongside your notebook, you have two options: use Jupyter Server Proxy (recommended), or use the Exposed Ports field available under advanced options.
Note
Port 8888 is reserved for usage by the Jupyter notebook server. Please run your tools on another port.
Using Jupyter Server Proxy
Jupyter Server Proxy is an extension for the Jupyter notebook server
that proxies request to /proxy URLs to the corresponding service.
Note
This extension is not installed on the default images that we provide. You need to create a custom Docker image where you install this extension (which is a good idea anyway to incorporate your specialized tool!)
An example Dockerfile can be found here: tensorboard-notebook/Dockerfile .
You can run this example by specifying
gitlab.ilabt.imec.be:4567/twalcarius/notebooks/tensorboard-notebook:latest in the Docker image field on
the JupyterHub launch page.
For example: we have started a tensorboard instance with the command
$ tensorboard --logdir /project/my-logs
Tensorboard launches a webserver which is accessible over http://localhost:6006 .
To access this service, you need to change the part of your JupyterHub URL after your username to /proxy/6006/.
An example URL is: https://jupyterhub.ilabt.imec.be/user/twalcari/proxy/6006/
Important
Do not forget the last / in the URL, as your tool will probably fail in unexpected ways without!
Using the Exposed Ports field
Under Advanced Options in the launch screen of JupyterHub, you can specify the extra ports that need to be exposed to the outside world in a comma-separated list.
Important
These exposed ports are only accessible over IPv6 or via the iGent VPN. Note that they can thus be accessed by anyone in the outside world with an IPv6-connection. Make sure that the service which you expose is properly secured!
After starting your Jupyter notebook server, you need to inspect the metadata of the corresponding GPULab job to find the hostname and port on which your requested port is exposed.
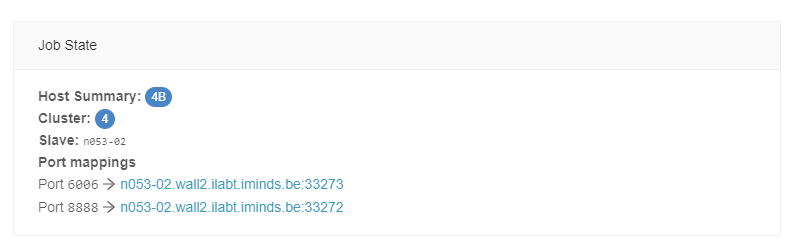
Via the GPULab site
After logging in on https://gpulab.ilabt.imec.be , find the job that contains your Jupyter notebook server. On the bottom of the General Info tab, you’ll find the hostnames and ports corresponding to your job:
Via the GPULab CLI
You can find the hostname and port mappings by looking at the Worker Host and Port Mappings entries when querying the job containing your Jupyter notebook server:
 $ gpulab-cli jobs d78cb4f0-c895-44d1-be0e-b09671903bca
          Job ID: d78cb4f0-c895-44d1-be0e-b09671903bca
            Name: JupyterHub-singleuser
     Description: Single Jupyter notebook instance for JupyterHub
         Project: testwimthijs
        User URN: urn:publicid:IDN+ilabt.imec.be+user+twalcari
         User ID: twalcari@ilabt
    Docker image: gitlab.ilabt.imec.be:4567/twalcarius/notebooks/tensorboard-notebook:latest
         Command: ['start-notebook.sh', '--notebook-dir=/project/', '--NotebookApp.default_url=/lab']
          Status: RUNNING
         Created: 2020-07-23T13:52:35+02:00
   State Updated: 2020-07-23T15:07:13+02:00
          Queued: 2020-07-23T13:52:35+02:00
      Cluster ID: 4
       Worker ID: 3
     Worker Name: n053-02
   Port Mappings: 6006/tcp -> 33273, 8888/tcp -> 33272
     Worker Host: n053-02.wall2.ilabt.iminds.be
         Started: 2020-07-23T13:53:04+02:00
        Duration: 2 hours, 4 minutes, 41 seconds
        Finished: -
        Deadline: -

