jFed for AM Developers
Note
This documentation has moved to https://doc.fed4fire.eu/#testbed-owner-documentation
If you develop an AM (typically supporting the Geni v3 AM API), to enable your testbed to be used from tools such as jFed, there are some practical things you need to be aware of.
This documentation goes into details about how to add your AM to jFed, how to test your AM with jFed, and gives some info on the advertisement and request RSpec that your AM might want to support.
Note
A lot of this documentation is not yet written. If you need a part that is not yet written, ask the jFed developers about it. We will gladly try to shift priorities to complete the required sections as fast as possible.
Adding an AM to jFed
Note
**This documentation has moved to https://doc.fed4fire.eu/#testbed-owner-documentation **
Todo
This documentation is under construction. Please contact jfed-bugreports@atlantis.ugent.be, and we will do our best to improve this document where you need it.
This sections explains how to add details about your AM to jFed. This is needed in order to use the AM from the jFed software.
First of all, note that this section is about ading an AM, an Aggregate Manager (sometimes also know as CM, “Component Manager”). If you want to setup and use your own user and slice authority (SA and/or MA), there are some extra complications not mentioned here. (Feel free to ask us for additional info if you are in this case.) Note that if you federate your AM with the fed4fire SA and MA, there is not need to configure jFed to use the SA/MA of your testbed (if you have one), so there is also no need to configure it in jFed.
In short, this section assumes that you have a fed4fire account, and you will login to jFed with this account, in order to use your AM.
Requirements
You need a few things before you get started:
- A server to run the AM software on.
- A publicly reachable IP for that server. This needs to be either an IPv4 or an IPv6 address. We recommend both.
- A DNS name for that server, that resolves to the publicly reachable IP addresses of the server. (Recommendation: It’s nice if the DNS name refers to your testbed and is specific for your AM. Example: am.mytestbed.example.com) (Note: A DNS name is not strictly required, but very highly recommended)
- Choose a URN for your AM. This is of the form: urn:publicid:IDN+DNSNAME+authority+am where your replace DNSNAME by the DNS name of your AM. (Example: urn:publicid:IDN+mytestbed.example.com+authority+am). If you don’t have a DNS name for your server use a globally unique name for your testbed instead. It’s not recommended to use an IP address instead, though that can work. Never use localhost or 127.0.0.1, and never use the default value of the AM software you use. (For more info, see Choosing your component manager urn)
- Choose a port at which you server will run. There is no standard port in the specification, so a lot of different ports are used in practice (12369, 8010, …). We recommend using port 443, if that is not in use by anything else. The advantage of using the default https port is that it is reachable through most firewalls, and the protocol is in fact using https.
- You need a X509 Server Certificate, because the AM server uses https. This can be a self signed certificate (jFed stores a list of these to make it work safely). However, in that case, make sure you configure the fields in your self signed certificate correctly. See the next section for more details.
- You probably have testbed resources that you want to make reachable to experimenters using SSH. There are 2 options, either you need to public IP addresses that you can assign to these nodes when needed (IPv4 or IPv6), or you need to have one machine with a publically reachable IP address (IPv4 recommended) act as a gateway. In both cases, make sure you have these address(es) available. You can combine the gateway machine with the machine on which the AM runs, but for security reasons, this is not recommended.
An example of these choices for the imec Virtual Wall2 testbed:
- IP: 193.191.148.179
- DNS name: wall2.ilabt.iminds.be
- URN: urn:publicid:IDN+wall2.ilabt.iminds.be+authority+cm So the URN including the DNS name as TLD/TLA part of the URN. “authority” as “type” of the URN, and “cm” as “name” part of the URN. (We actually recommend “am” as name instead of “cm”, but both are fine.)
- Server certificate:
- Not self signed in our case, but signed by a trusted root.
- “Subject Name” contains CN=www.wall2.ilabt.iminds.be, as well as details about our address and organisation
- “Subject Alternative Name” contains DNS:www.wall2.ilabt.iminds.be, DNS:boss.wall2.ilabt.iminds.be, DNS:authority.ilabt.iminds.be
- Our server runs at port 12369, because emulab already uses port 443 for another webserver, with different SSL settings.
- The full URL at which our AM is reachable is: https://www.wall2.ilabt.iminds.be:12369/protogeni/xmlrpc/am/3.0
- Experimenters can reserve servers at our AM. All of these are then reachable with SSH using public IPv6 addresses. We also have a pool of IPv4 addresses which users can assign to servers if needed. In addition, we have a gateway (bastion.test.iminds.be, which has both an IPv4 and IPv6 address), which can be used by experimenters that do not have IPv6.
Server X.509 Certificate
An AM uses a message format specified in Geni AM specification, which is sent over XML-RPC, which is sent over HTTPS with client authentication. So an AM runs at a HTTPS server (= HTTP over SSL) that is configured to require client authentication.
This means that the firsts step is to correctly setup the SSL server. That requires a server X509 certificate and matching private key. This certificate is used to identify the server to the users. Because only the server has the private key matching the certificate, users can setup a secure connection.
For SSL on the public internet, it is required that your server’s X509 certificate is signed by a trusted root. All browsers have a list of these trusted roots. This is in short how the internet is made secure.
jFed also uses the internet’s trusted roots, so if your server certificate is signed by these, that should be enough. However, for convenience, jFed also allows you to use a self signed X509 certificate. You can then add this self signed certificate to the list of certificates that jFed trusts, and everything will work without requiring the hassle of aquiring a “real” X509 certificate signed by a trusted root.
However, in recent years, thanks to “Let’s encrypt” and the excellent tool certbot it is now usually easier to get a real valid X509 certificate than it is to generate a decent self signed certificate. Because of this, we recommend setting up certbot on your server, and letting it generate the X509 certificate. Make sure that you setup certbot to automatically renew the certificate (using cron or a systemctl timer), and to restart the AM server when it does (this can be done using the certbot “post-renew hook”).
As mentioned, you can also generate a self signed certificate and register it to the central list of certificates that jFed trusts. When generating a self signed certicicate there are some best practices to take into account, regarding the self signed X509 certificate that you generate for your AM:
- “Subject” field of the certificate must contain a “CN” that is the hostname of the server (NOT and IP, the DNS hostname!)
- The “X509v3 Subject Alternative Name” section, must contain a “DNS” entry, which is the hostname of your server (NOT and IP, the DNS hostname!). Note that this means that your AM needs a DNS name, not just an IP address!
- If the self-signed certificate is signed by another self-signed certificate, you need to include that other certificate in the “certificate chain” when configuring the AM’s SSL.
Note that you can also add your AM to jFed if the first 2 guidelines are not respected. However, try to at least have a meaningful “Subject” “CN”, and avoid a “Subject” “CN” like “localhost” at all cost. Also not that this will probably cause problems with non-jFed tools.
Allowing access to federated users
Federate with Fed4FIRE+ User and Slice Authority
Your AM needs to be configured so it is federated with the Fed4FIRE+ user and slice authority. How to do this depends on the AM software.
General instructions: You need to add the new Fed4FIRE+ root certificate and optionally also the old Fed4FIRE+ root certificate to the list of trusted authorities.
AM specific instructions:
- For GCF, you need to put the root certificate file in the gcf trusted_roots directory (this is configurable with
rootcadiringcf_config, check the default value in the gcf repo). Example command to do this:curl https://portal.fed4fire.eu/root_certificate > ~/.gcf/trusted_roots/fed4fire.ilabt_imec_be.pem(and then restart the AM)
Todo
this section needs to be expanded with the exact procedure for other AM software (emulab, …)
The result of configuring this is:
- Your AM will allow (client-authenticated) SSL connections from Fed4FIRE+ users. If not configured correctly, your AM might terminate SSL handshake from Fed4FIRE+ users (so no HTTP data is even sent). If correctly configured, your AM will know for each connection that a Fed4FIRE+ user is connected. This is the “authentication” part.
- Your AM will accept user and slice “credentials” that it receives from Fed4FIRE+ users. It will know what Fed4FIRE+ allows these users to do (typically, a slice credential will tell the AM a user can reserve resources). This is the “authorization” part.
Firewall
You’ll need to make sure some ports are reachable:
- Your AM is listening on one or two ports, and these should be publicly reachable.
- If your testbed nodes are reachable directly, the necessary ssh port on each node should be publicly reachable. If you use a testbed specific ssh proxy/gateway, only that proxy should be publically reachable.
- Your AM should be ping-able from the Fed4FIRE+ monitoring domain, so it should allow ICMP for at least that domain.
- Your testbed OML monitoring should be able to create outgoing connections to the Fed4FIRE+ monitoring domain. (Allow outgoing TCP to flsmonitor.ilabt.imec.be:3003)
Note: The Fed4FIRE+ monitoring connections will come from:
2001:6a8:1d80:2031:225:90ff:fe1d:1c68193.191.148.194
Only for ICMP you could choose to allow only these (but you can also allow public access). For AM and SSH access, the ports need to be publicly reachable anyway. Don’t rely too much on these not changing, you probably need to allow the whole subnet.
Configuring the AM GetVersion call
Your AM needs to be configured to return the correct info in the GetVersion reply. This is not a critical step, and it can be skipped. But it is a good practice to get this right. It also makes the jFed scanner work better.
The GetVersion call is a call that the scanner uses to retrieve basic server info. It is defined in the AM specification.
The results contains a lot of info, most of which will be automatically filled in correctly by the server software.
Experience shows that the following fields have to be checked for correctness:
"urn": "urn:publicid:IDN+example.com+authority+am",
"geni_api_versions": {
    "2": "https://example.com/am/2",
    "3": "https://example.com/am/3"
}
You need to make sure that:
The URN is correct. That includes the hostname part (
example.comin the example above), and the name partamin the example above. The name should beam, orcm. The URN must always match the expected URN in thecomponent_manager_urnattribute in the request RSpec.The
geni_api_versionsURLs must point to the correct server URL(s). This must be the URL at which the AM is publically available. Make sure that:- The protocol is
https - The port is correct
- The path is correct
- The hostname is not
localhostor127.0.0.1. - Preferably, the hostname is not an IP address but a DNS hostname.
- Multiple URLs are allowed if the server supports multiple AM versions. But this is not required. Do make sure however that at least the version contacted is listed. That is, if you connect to
https://example.com/am/2it is at least expected that"2": "https://example.com/am/2"is listed.
- The protocol is
Todo
this section needs to be expanded with info for specific AM software
Using the jfed scanner tool
Note
This method is no longer recommended. It is not maintained an very user unfriendly. We recommend adding the testbed to the global config (see Adding to global fed4fire config) and adding a “dev-testbed” icon (see Adding your AM to one of the experiment GUI “icons”).
Note
This section assumes you are using linux or MAC. Instructions for windows are very similar.
The jFed scanner can be used to automatically detect basic AM server settings, and store them for use by the other jFed tools. This way, you can add use an experiment AM to your local jFed, and test it.
While the scanner can be a usefull tool, it fails in some scenarios (as it is hard to test all strange AM configurations). It is also not frequently tested, so it can break in some releases. Finally, it is not aimed at end users, and is thus not a user friendly tool. For these reasons, if you experience problems with it, don’t hesitate to contact us.
You can find the current stable jFed Scanner GUI in this archive.
After downloading the archive, and extract it to a directory. Then execute scanner-gui.jar.
Example commands:
 $ wget -nv https://jfed.ilabt.imec.be/releases/develop/VERSION/jar/jfed_gui.tar.gz
2017-01-10 11:27:28 URL:https://jfed.ilabt.imec.be/releases/develop/VERSION/jar/jfed_gui.tar.gz [25654644/25654644] -> "jfed_gui.tar.gz" [1]
 $ tar xfz jfed_gui.tar.gz
 $ cd jfed_gui
 $ java -jar scanner-gui.jar
NOTE: Replace VERSION in the command above with a jFed version. You can find a link to the stable version at https://jfed.ilabt.imec.be/downloads/ or you can pick a development version at https://jfed.ilabt.imec.be/releases/develop/?C=N;O=D
Once the scanner tool has started, log in using your Fed4FIRE+ account.
In the next screen, fill in the Aggregate Manager URL, and click the Scan button.
Requirements for the URL:
- It needs to be HTTPS
- Do not forget the correct port
- Do not forget to add the full path to the AM endpoint
- Preferably, use a DNS hostname, not an IP address
When the scan is completed, you end up on the Scan Overview tab. Here, in the ideal case, you’ll see 4 green OK statuses. If not, something went wrong.
In the Call Logs and Debug Logs tab, you can find debug info which can help when something goes wrong.
In the Scan Output tab, all information the scanner gathered is shown. It is sometimes needed to uncheck the checkboxes next to any incorrect or uneeded information. But usually, you do not need to do anything here.
In the Security tab, you will find the X509 certificate of the server. You need to verify if this is indeed the certificate of your server, and if that is so, you need to check the checkbox next to I trust all of the certificates above.
Then, click on the Show Results button.
You will see a JSON snippet containing the info that jFed will use. You can edit the following fields:
id: This should be a very short unique ID for the testbed. It should only contain letters, no spaces or special characters.longName: This is the “human readable” name of your testbed. This name may contain spaces and special characters.server/name: This is the “human readable” of the testbed server. This name may contain spaces and special characters. (It can be the same as the testbed longName)defaultComponentManagerUrn: This is the URN of your AM. Make sure it is correct.
If you click on Add to local jFed, the JSON snippet will be stored in ~/.jFed/extra_testbeds/<id>.json (where <id> is the ID you chose for the testbed). All jFed tools will load files from that dir to add additional testbeds.
Todo
this section needs some screenshots
Local files for adding testbeds
Note
This method is no longer recommended. It is not maintained an very user unfriendly. We recommend adding the testbed to the global config (see Adding to global fed4fire config) and adding a “dev-testbed” icon (see Adding your AM to one of the experiment GUI “icons”).
Using local files, you can add your AM to jFed.
When the jFed scanner has succesfully scanned a server, it shows a button “Add to local jFed”, which will write such a file.
These files are stored in the jFed config dir, in the extra_testbeds dir. On Linux this is in ~/.jFed/extra_testbeds/.
Below is an example of such a file with dummy values. You can also look at the global jFed configuration (see link in next section) for real examples.
Content of ~/.jFed/extra_testbeds/mytestbed.json:
{
    "id": "mytestbed",
    "longName": "My Brand New Testbed",
    "defaultComponentManagerUrn": "urn:publicid:IDN+mytestbed.org+authority+am",
    "allowLinks": false,
    "servers": [
        {
            "name": "My Brand New Testbed",
            "certificateChain": "-----BEGIN CERTIFICATE-----\nMII... SERVER CERTIFICATE HERE ...\n-----END CERTIFICATE-----\n",
            "urnTld": "mytestbed.org",
            "baseUrl": "https://am.mytestbed.org/",
            "flags": [
                "featureExecuteAndInstallService",
            ],
            "services": [
                {
                    "api": "Geni.AM",
                    "apiVersion": "3",
                    "url": "https://am.mytestbed.org/",
                    "urn": "urn:publicid:IDN+mytestbed.org+authority+am",
                    "@type": "Service"
                }
            ],
            "defaultComponentManagerUrn": "urn:publicid:IDN+mytestbed.org+authority+am",
            "@type": "Server"
        }
    ],
    "@type": "Testbed"
}
Adding to global fed4fire config
The jFed team can also add the same info about your AM, to the “global” jFed/fed4fire config. That enables the use of your AM for all jFed users. The global configuration is available via the fed4fire API, at https://flsmonitor-api.fed4fire.eu/testbed?embed=true
Note that this does not add your testbed to any of the “icons” in the jFed GUI. But you can test your testbed from jFed by manually editing the request RSpec once the testbed has been added to the global configuration.
Contact us to add your AM for all users.
You do not need to have a local working config, but that helps.
The minimal info you need to send us is:
- The URL at which your AM runs (the full URL, including hostname, port and path)
- The name you want to see for your testbed inside jFed and at our monitoring site
- An example request RSpec (which shows us the sliver_type(s) used and other info)
- Does your testbed support (or even require) specifying disk images in the request RSpec?
- Does your testbed support (or even require) assigning specific nodes (component_id attibute) in the request RSpec?
- Does your testbed support (or even require) specifying hardware types in the request RSpec?
- Are links between nodes of your testbed supported?
- Does your testbed support “stitched” links? (If you’re unsure what that is, your testbed doesn’t support them.)
Other info which is usefull to send us is:
- Which “icon” in the jFed experiment GUI is the best match for your testbed nodes (ex: physical node, VM, wireless, …)?
- For security reasons, it is recommended to also send your server certificate (in PEM format). We can also retrieve the certificate ourself, but theoretically, that could be intercepted.
- The coordinates of the testbed (latitude, longitude and country)
- Info on the organisation running the testbed (full name, latitude, longitude, country, address, link to logo, link to website)
- Additional info about your testbed: link to documentation, link to testbed description and/or other general testbed information.
- If your testbed has a web interface (where users can login and control the testbed) in addition to the AM, you can send us that link as well.
- The email address(es) of the “primary” contact(s) of the testbed. If we need to contact someone about the testbed, we use these emails.
- The email address(es) of the “technical” contact(s) of the testbed. For technical questions about the testbed, these emails are used. These emails also are used for automatic mails about the tests, and in the future, testbed specific bugreports will also be sent here. Let us know wether or not you want the technical contact(s) of the testbed to receive automated emails when the testbed goes down.
- The email address(es) of the GDPR contact(s) of the testbed. Anything related to the GDPR we will send here.
- The URN(s) of the users that may have admin access to some of the data we store about your testbed. This is currently not used, but we plan on using this later to allow you to restart tests, enable/disable tests or edit testbed info. This is typically the URN of the users you use to login to jFed.
- Which software does your testbed AM use? Typical options are: emulab, gcf, openstack, …
(A lot of email addresses are mentioned above, but typically, they are all just the same single email address.)
Adding your AM to one of the experiment GUI “icons”
The jFed Experimenter GUI has a graphical editor, where you can drag “icons” to the canvas and in this way easily configure an experiment. Each of these icons has their own list of relevant testbeds.
Note that you do not need these icons to test your AM using the jFed Experimenter GUI: after you added your testbed to jFed, you can directly edit the XML Rspec, and everything will work.
It is currently not possible to manually add a testbed to one of these jFed icons in your local jFed install. Adding testbeds to the “icons” can only be done by the jFed developers. When you contact us to add your testbed to jFed for all users, we will discuss which icon(s) it needs to be added too, and add it for you.
Typically, to allow you to test without adding the testbed to the icon for all users, we add it to “dev-testbeds”. Icons added here are not available to all users. To show these testbeds in jFed:
- Click the “jFed Preferences” button
- On the left, choose “Icon Catalog & Gui Fine-tuning”
- On the right, in the “Extra Flags” field, enter the text “dev-testbeds”
- On the bottom of the dialog, press the “Save” button
- Restart jFed
- You will be able to select the testbed when using the appropriate icon
Note that any user (so not just you), can choose to see and use the dev testbeds icons in jFed in this way.
jFed and Testbed specific documentation
The jFed experimenter GUI shows links to the testbed documentation. This makes it easy for experiments to find testbed documentation.
Two links can be set in the central jFed config, which will both be shown in jFed:
- “Testbed Info” button: a link to a (short) general description of the testbed
- “Testbed Documentation” button: a link to a site that has step by step instructions on how to use the testbed from jFed. A short and simple “getting started” tutorial is ideal. It’s off course also nice if this site contains links to more info and more advanced tutorials.
These links are stored in the central jFed config, and testbed owners can ask us to add/update it. In future jFed versions, this link might be shown more prominently.
Todo
this section needs to be extended with an screenshot of these buttons inside jFed
Handling Testbed Specific Terms & Conditions (i.e. handling GDPR)
Note
This documentation has moved to https://doc.fed4fire.eu/#testbed-owner-documentation
Testbed Specific Terms & Conditions (T&C)
Each testbed needs to have a site, with Testbed Specific Terms & Conditions. This is not necessarily hosted on the same domain as the AM, but that is possible and not a bad idea.
The basic requirements for such site are that they store if a user has consented to the T&C. So some form of DB is typically needed. When a user has not yet consented, the testbed can choose to disallow the user access. For this functionality, the testbed AM needs to access the consent DB.
Users need to identify themself to T&C sites, the only logical method of doing is, is using the fed4fire method: https client certificates (= X509 certificates used in SSL client authentication).
jFed support for Testbed Specific Terms & Conditions (T&C)
jFed has extensive support for sites with Testbed Specific Terms & Conditions. This means that Testbed Specific T&C sites can integrate with jFed, but this is not required.
To integrate in jFed, T&C sites need to be registered in the jFed central config. No more is required.
Additionally, T&C sites can integrate further with jFed, by using jFed specific javascript, to:
- Detect if they are running inside jFed:
if (window.jfed) - Report to jFed if the user has consented (and for how long), or has declined the T&C:
jfed.decline();andjfed.approveWithDateISO8601(\"2018-05-19T13:05:00+02:00\");(and other date options) - Request jFed to close the browser window:
jfed.close();
As mentioned, jFed also works with sites that do not use any of the specific javascript. In this case, jFed will open the site in a window, and when it is closed will assume that the user has accepted the T&C.
jFed T&C integration javascript details
When jFed loads the T&C site, it is useful to let jFed know if the user has already accepted the T&C before, or not. However, when the site javascript runs, jFed has not yet had time to inject its code into the site. To solve this, you can use this method:
function initJFed() {
  if (window.jfed && window.jfed.decline) {
      //Here, you would check if the user has accepted the terms and conditions, or not.
      //if the user has accepted, let jFed know
      //window.jfed.approve(); //uses default timeframe configured in the jFed central config

      //if the user hasn't accepted yet, let jFed know
      window.jfed.decline();
  }
}

//run this to automatically contact jFed when its javascript becomes available
if (window.jfed) {
  initJFed();
} else {
  //window.jfed is not (yet) available
  //trick to make browser call  initJFed() when window.jfed becomes available.
  Object.defineProperty(window, 'jfed', {
    configurable: true,
    enumerable: true,
    writeable: true,
    get: function() {
      return this._jfed;
    },
    set: function(val) {
      this._jfed = val;
      initJFed();
    }
  });
}
There are multiple methods to signal to jFed that the user has accepted the T&C:
//report approval of the T&C to jFed (without specifying end date of approval)
//(This will cause the default duration configured for this specific testbed in the central jFed config to be used)
jfed.approve();

//report approval of the T&C to jFed, and specify a date in ms since epoch  (javascript Date.getTime() returns this)
jfed.approveWithDateInMillisecondsSinceEpoch(Date.now()+(24*3600*30*1000));

//report approval of the T&C to jFed, and specify the relative date in days from now
jfed.approveDaysFromNow(7);

//report approval of the T&C to jFed, and specify a data in ISO8601 format (RFC3339 is a subset of ISO8601)
jfed.approveWithDateISO8601(\"2018-05-19T13:05:00+02:00\");
You can also report that the T&C are not accepted:
//report decline of the T&C to jFed
jfed.decline();
You can also request jFed to close the browser window:
//close the jFed T&C window from within javascript
jfed.close();
When something goes wrong, and no javascript is used, jFed reverts to the fallback. This means that when you close the window, jFed will assume that the user has accepted the T&C.
Because of this, it’s not a bad idea to initially call jfed.decline();.
Parts of a T&C site
There are 3 parts that make up a T&C site:
- Part 1: The “T&C frontend website”, which serves the html page to the browser, is thus accessible through https, and identifies users.
- Part 2: The “Acceptance DB web api”: A web api to store if users acceptance of the T&C. This links the AM and the T&C frontend website.
- Part 3: The AM, which checks if the T&C is accepted for the current user.
There are many ways to seperate or combine these parts. Some examples:
- Scenario A: Part 1 can be hosted on a regular webserver (apache, nginx) and be made up of only html, css and javascript. Part 2 is a stadalone web api running on a different part of the website, for example it could be a python “flask” based web api running on a seperate port, to which the main website proxies. The AM contains part 3 which could call the acceptance DB web api to determine if a user has accepted the T&C.
- Scenario B: Part 1 and part 2 combined can be a php website with a DB behind it. The T&C frontend website and “Acceptance DB web api” are tightly integrated in this case. In this scenario, part 3 could be code in the AM that calls the DB directly to determine if a user has accepted the T&C.
- Scenario C: All 3 parts can be integrated directly into the AM. The AM thus has to serve a website in addition to the AM API.
Example: Standalone “Acceptance DB web api”
(This is scenario A, where part 2 can be fully seperated from part 1 and 3)
A standalone “Acceptance DB web api”:
- Use https with client authentication enabled. Since the site has no purpose without a valid user, it makes sense to make SSL user authentication mandatory (this is an SSL setting).
- The web api must be configured to allow users of the fed4fire authority access. (This is done by trusting the root certificate for wall2 in the server config)
- The web api must extract the user URN from the certificate used to authenticate.
- When a user signals decline or approval of the T&C using a call, this decision must be stored in a DB at the server.
The technology chosen for the web api (php, python, java, …) and the specific DB used are up to the testbed to decide.
Here is a possible API:
GET /terms_conditions/accept returns a JSON object in the form:
{
  "accept": true,
  "testbed_access": true,
  "user_urn": "urn:publicid:IDN+authtld+user+username",
  "until": "2020-02-13T14:44:44.944825+00:00"
}
PUT /terms_conditions/accept is used to register accept or decline to the T&C. The same form of JSON object is used, but the “user_urn”, “until” and “testbed_access” fields do not have to be sent (they are set by the web api).
Optional: DELETE /terms_conditions/accept the user explicitly declines all terms. Any acceptance record will be removed from the DB (So and all mention of the user can be removed as well).
(We might add an example of such a standalone web api in the future)
Example: Standalone T&C site
(This is scenario A, where part 2 can be fully seperated from part 1 and 3)
(We might add an example of such a standalone site in the future)
Optionally, this site can use the jFed T&C integration javascript mentioned above.
You can use the example in the next section as a partial example for a standalone site: Take a look at terms_conditions.html and terms_conditions.js in https://github.com/wvdemeer/docker-am/tree/master/gcf_docker_plugin/terms_conditions
Example: AM with T&C site built in
(This is scenario C)
It’s also possible to integrate the site directly in the AM code. One of the advantages is that the site can then easily run at the same domain and port of the AM. The SSL authentication is also already configured as the AM requires the same.
To demo this, we’ve modified a GCF based site, the docker AM. Looking at these changes, you should be able to modify any gcf based site in the same way. The main files for this addon are here: https://github.com/wvdemeer/docker-am/tree/master/gcf_docker_plugin/terms_conditions The exact changes that were needed can be seen here: https://github.com/open-multinet/docker-am/compare/master…wvdemeer:master
Note that these changes require changes to the geni-tools repository (“geni-tools” submodule). The needed changes can be found in this branch: https://github.com/wvdemeer/geni-tools/tree/feature-cust-req-hand-cls (There is a pull request to pul lthese changes into geni-tools, so if that is closed, this step won’t be needed: https://github.com/GENI-NSF/geni-tools/pull/927)
Add T&C site info to central jFed config
Send us the following info:
- What is the URL of the T&C site for your testbed?
- Do these T&C need to be approved per user? Or per project or even slice? (we recommand per user if possible)
- For per user approval, how long does the approval remain valid (i.e. how long before the user need to re-approve)? (in days)
We will add this info to the central jFed config, so that jFed will send users to the T&C site when they start an experiment.
In case you update the conditions on the T&C site, let us know. We can change the version in the config, which will cause jFed to require all users to visit the T&C site again.
Technical details: We add the following to the testbed config:
"gdprInfo": {
    "grpdUrl": "https://example.com/terms_conditions/index.html",
    "acceptPeriodInDays": 365,
    "acceptSubject": "USER",
    "version": "1",
    "@type": "GDPRInfo"
  }
Here’s an example: https://flsmonitor-api.fed4fire.eu/testbed/iminds-docker
Make the AM reject users that did not approve the Terms & Conditions
It should be sufficient to only add a check to the Allocate call.
In case the user is not known to have approved the T&C of the testbed, we strongly recommend using this error message:
{
   "output": "[T&C-APPROVAL-MISSING] Approval of the Terms & Conditions is required in order to use this testbed. Please visit https://example.com/termsandconditions",
   "code": { "geni_code": 7 }
}
Notes:
- The above is a JSON representation of the XML-RPC reply, the actual reply is off course in XML. (But JSON is much easier to read.)
geni_code7 is used. This code is the general code for “REFUSED” “Operation Refused”- Be sure to include “[GDPR-CONSENT-MISSING]” for automatic detection of this error by jFed. jFed can then show the appropriate error dialog.
- It is also important to include a human readable message, and a link to the actual terms and conditions of the testbed. This is essential for users that do not use jFed.
- The
valuefield is ommitted above, but it may be included. It is optional because this is an error reply. - An AM may optionally include an
am_typeandam_code. You are free to use what you want for these.
Debugging your AM
Note
This documentation has moved to https://doc.fed4fire.eu/#testbed-owner-documentation
jFed offers some tools that can help a lot when debugging your AM.
Once your AM is running, we can add it to our fedmon monitor.
jFed Probe GUI
Todo
this section needs to be expanded
The jFed Probe GUI is a tool for manually calling servers. Very low level calls can be made, and low level replies are visible. This tool requires knowledge of the communication APIs, and the tool itself is not a very user friendly GUI. It can be very valuable for testbed developers that wish to debug their server.
While you can execute all calls by filling in all details manually, for convenience, the probe GUI can automatically execute user and slice related calls with minimal user input:
- Start the Probe GUI and login
- Expand “API Wrappers”
- Expand “Automatic User and Slice API Wrapper”
- Select “getLocalUSerCredentials”
- Click the big “Call” Button. After a while, you’ll see that a call was done, and it’s results will appear. This call contains the user credential. (the jFed probe has stored it and will automatically fill it in for next calls.)
Now that you have a user credential, you can use it to create a slice:
- Go to the “Automatic User and Slice API Wrapper” methods, and select “createSlice”
- In the form to the left, fill in “sliceName”, choose an expire time (2 hours by default)
- Click to check the checkbox before “subAuthName”, and fill in the EXACT name of your project as “subAuthName”. (“sub authority” and “project” are the same thing)
- Click the big “Call” Button. After a while, you’ll see that one or more call are done, and their results will appear. This last call contains the slice credential. (the jFed probe has stored it and will automatically fill it in for next calls.)
If you go to any AM call now, you will see that the slice name and credential are filled in by default.
jFed automated tester
The Automated Testing GUI: This tool is used to run tests scenarios on servers. This is only useful for server developers, and it is not a very user friendly GUI. It includes simple tests, such as veryfing if the GetVersion reply of an AM server is correct, and more complex tests, such as verifying if an AM can correctly provision a node, and if that node can be logged in to using SSH.
First start the automated tester. You can find the latest jFed releases here. Download the “jFed GUI (archive)” from that page.
After downloading the archive, extract it to a directory. Then execute automated-testing-gui.jar.
Example commands:
$ wget -nv https://jfed.ilabt.imec.be/releases/develop/VERSION/jar/jfed_gui.tar.gz
2017-01-10 11:27:28 URL:https://jfed.ilabt.imec.be/releases/develop/VERSION/jar/jfed_gui.tar.gz [25654644/25654644] -> "jfed_gui.tar.gz" [1]
$ tar xfz jfed_gui.tar.gz
$ cd jfed_gui
$ java -jar automated-testing-gui.jar
NOTE: Replace VERSION in the command above with a jFed version. You can find a link to the stable version at https://jfed.ilabt.imec.be/downloads/ or you can pick a development version at https://jfed.ilabt.imec.be/releases/develop/?C=N;O=D
You can also use the installer, and install the automated tester that way.
When you start the automated tester, you need to log in with your user account.
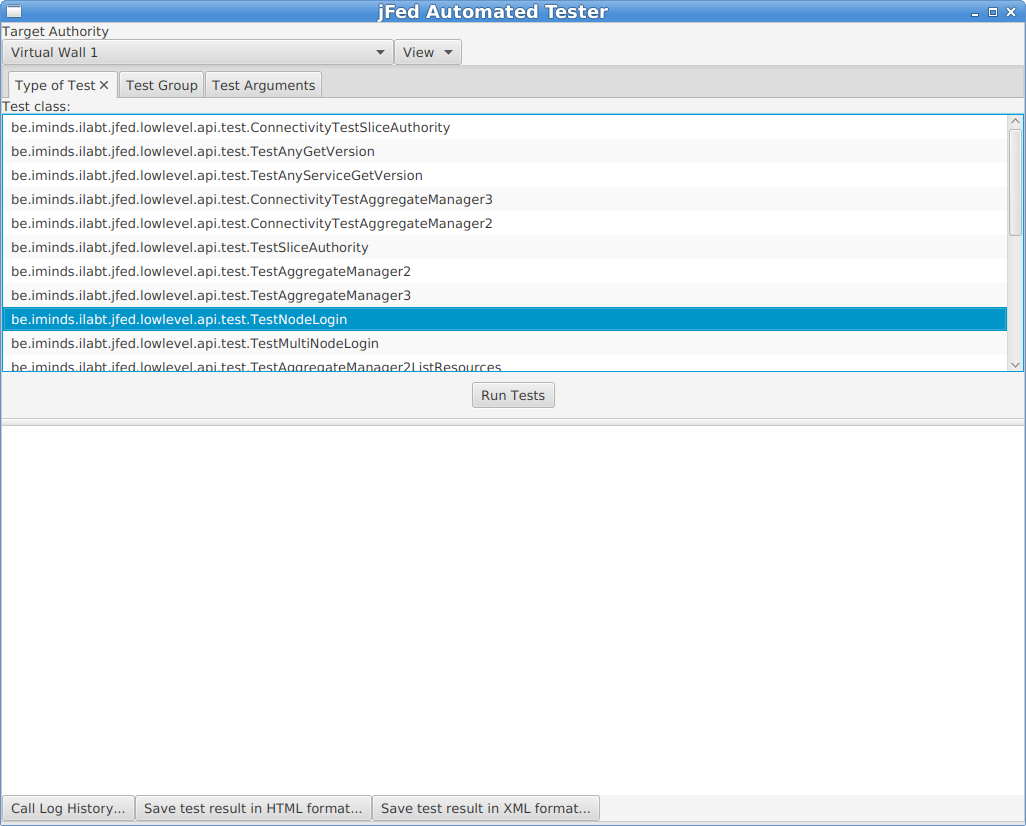
On the next page, you need to select the testbed you want to test, and the test you want to run.
In the example below, we are testing the “Virtual Wall 1” testbed. The chosen test is “TestNodeLogin”.
This test will create a new slice at the logged in user’s authority. Then it will contact the tested testbed, it will execute Allocate and Provision calls, wait for the nodes to become ready, and then try to log in to the nodes.
Finally, no matter wether the tests fails or succeeds, a Delete call is made to free any resource reservations.
When the testbed (“Target Authority” at the top of the window) and the test are selected (in the “Type of Test” tab), you can optionally go to the “Test Arguments” tab. This tab lists all possible options for the tests. For a lot of tests, these are a lot of options, and they are undocumented. For the “TestNodeLogin”, you typically do not need to change anything. Some interesting configuration options are:
fixed_rspec: You can specify a custom RSpec here, if the automatically generated RSpec is not ok.fixed_rspec_url: You can specify the URL to a custom RSpec here, instead of entering the Rspec directly as with thefixed_rspecoption.
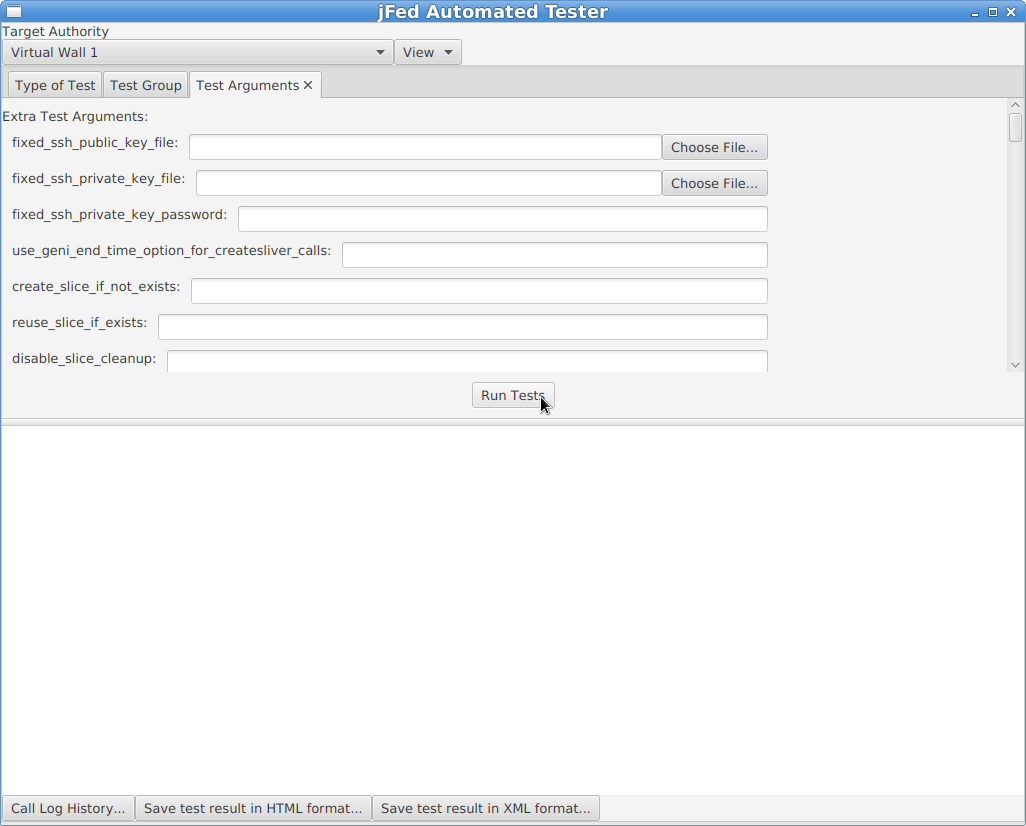
Next, click on the “Run Tests” button. You will see a progress bar while the test runs. A “TestNodeLogin” can take a few minutes, to more than 20 minutes, depending on how fast the AM is, and wether the nodes come online or not.

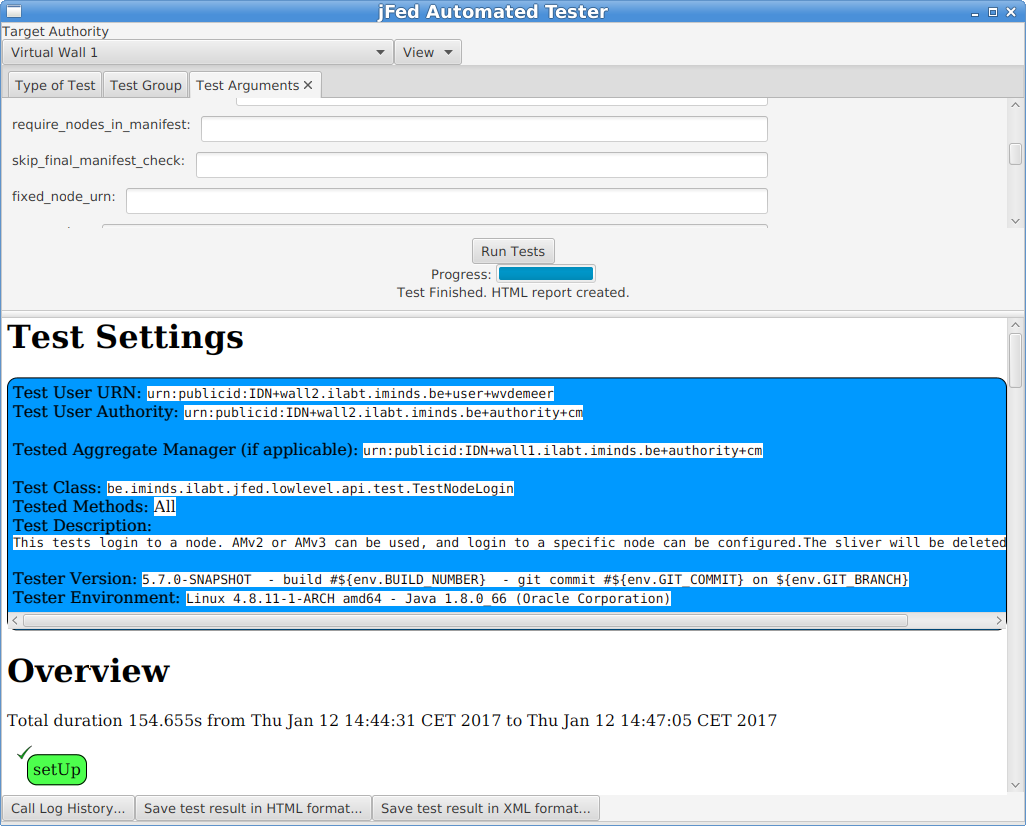
A test report will appear in the bottom half of the window when the test is finished. You can look into the details of each step. Note that you can click the “Hide/Show” buttons to show additional call details.
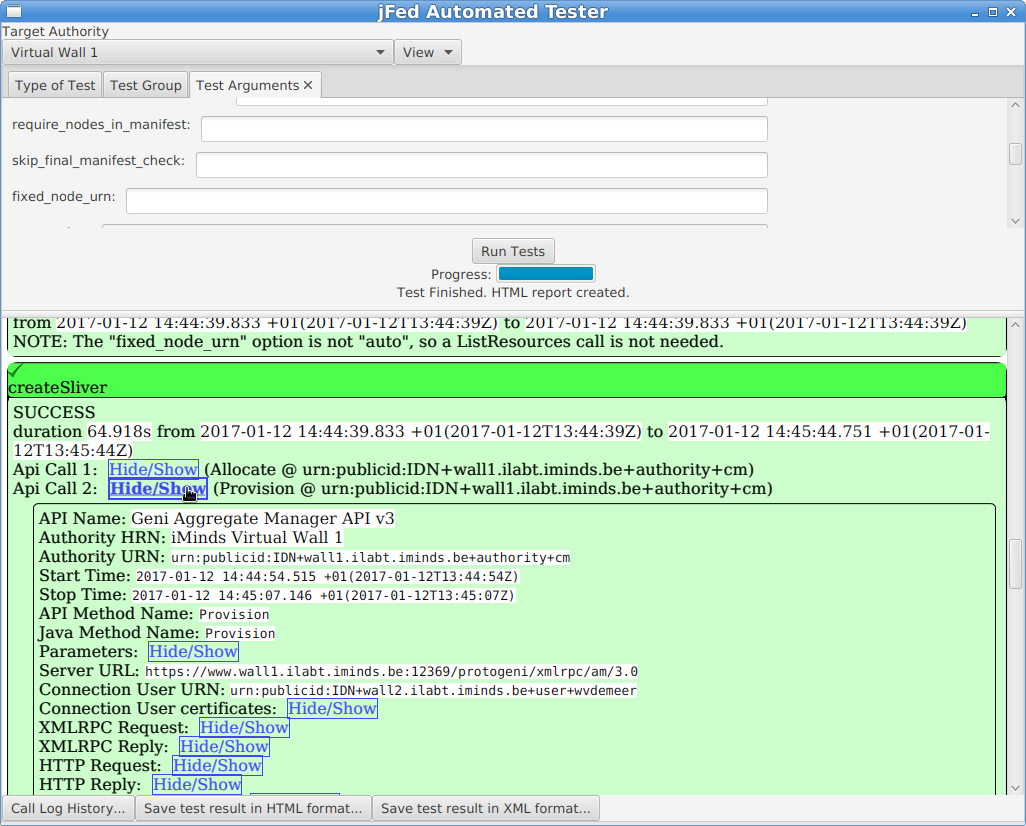
At the bottom of the window, there are some buttons of interest:
- The “Call Log History” button allows you to see the call details in the same way as the jFed probe shows them. This is sometimes easier than the HTML view above.
- You can use “Save test result in HTML format” to store the result to disk, which can be handy to send them to others.
Todo
this section needs to be improved
Permanent monitoring: Fedmon
Todo
this section needs to be written
The jFed team can add your AM to the “federation monitor”. Ask us about this.
As an example, here is the monitoring overview for all monitored imec/iMinds testbeds: https://flsmonitor.fed4fire.eu/fls.html?testbedcategory=iMinds&showlogintests
Rspec details for AM developers
Note
This documentation has moved to https://doc.fed4fire.eu/#testbed-owner-documentation
General
There are 3 types of RSpecs, request, manifest and advertisement RSpecs.
All RSpecs must be valid XML, and for each type a slightly different schema is used. Not that “valid XML” is defined as:
- It is well formed XML (closing and ending tags match, etc.). This means the XML can be parsed without error by an XML parser.
- The XML follows the specified schema. This means that all rules specified in the schema are followed, and the rules conserning namespace are followed.
The XSD files that define the RSpec schema for “geni version 3 RSpecs” can be found at the URI used to identify the namespace: http://www.geni.net/resources/rspec/3 .. note:: There are 3 root xsd files at that location: one for the request RSpec schema, one for the manifest RSpec schema and one for the advertisement RSpec schema. .. note:: The URI used to define an XML namespace does NOT need to host any XSD files. This is often done as it is a convenient location, but the URI can also be only an identifier. Research XML namespaces if this is confusing.
The Rspec schema’s allow a lot of freedom: they allow adding custom elements at different places in the RSpec. However, this is only allowed if the additions are in a different namespace than the “geni v3 rspec” namespace. This means you need to define a custom namespace for any RSpec extension you make!
Note that there are certain rules on how an AM should handle unknown RSpec extensions in RSpec requests. See the section on requests RSpecs below.
Choosing your component manager urn
In the RSpecs, resources belong to a certain “component manager”. This is the authority responsible for these resources, and thus it is typically your AM itself.
This binding is represented in each RSpec, using the component_manager_id attribute, which has an URN as value.
More info on the exact format of the URNs used can be found at http://groups.geni.net/geni/wiki/GeniApiIdentifiers.
Put simply, the URN using for the component_manager_id attribute is either of the form urn:publicid:IDN+TOPLEVELAUTHORITY:SUBAUTHORITY+authority+cm or of the form urn:publicid:IDN+TOPLEVELAUTHORITY:SUBAUTHORITY+authority+am. (both ending, cm and am are in use at different testbeds. We recommend am, but it doesn’t really matter.)
It is best NOT to use :SUBAUTHORITY at all, unless you really know you need it. So the typical urn is: urn:publicid:IDN+TOPLEVELAUTHORITY+authority+cm
The TOPLEVELAUTHORITY part of the URN is preferably the top level DNS name of your AM. In some cases, a nickname is also ok. Both localhost or 127.0.0.1 are not allowed. IP addresses should be avoided.
This URN is used in the following places:
* In the ``component_manager_id`` attribute of node elements in the advertisement RSpec.
* In the ``component_manager_id`` attribute of node and link elements in the request and manifest RSpec.
* Optionally: in the ``GetVersion`` reply, in the ``value`` ``urn`` field.
A few examples of real component manager URNs:
* urn:publicid:IDN+wall2.ilabt.iminds.be+authority+cm
* urn:publicid:IDN+utah.cloudlab.us+authority+cm
* urn:publicid:IDN+fuseco.fokus.fraunhofer.de+authority+cm
* urn:publicid:IDN+instageni.cs.princeton.edu+authority+cm
* urn:publicid:IDN+exogeni.net+authority+am
* urn:publicid:IDN+exogeni.net:bbnvmsite+authority+am
RSpec basics: sliver_type and exclusive
The basic rspec format allows expressing raw bare metal hardware nodes as well as VMs/container nodes. The sliver_type element is used, as well as the exclusive attribute. Support for both is mandatory in each of the RSpec types.
The sliver_type element is used to specify which sort of node is requested or available. The 2 common cases are bare metal, and virtual machines. You are free to pick a sliver_type name that makes sense for your testbed.
For bare metal nodes, emulab uses raw-pc as sliver_type name.
Some examples of sliver_type names for virtual machines:
default-vmis defined within geni as a “convenience” sliver type. Each AM that supports VMs is supposed to replace this by the default VMsliver_typefor that AM. This is makes it easier to write portable RSpecs that can be executed on multiple testbeds, without changing thesliver_typefor each testbed. It is useful to support this feature if you AM supports VMs, but it is not mandatory.emulab-xenandemulab-openvzare the VMsliver_typeused by emulab (and thus instageni).xo.tiny,xo.small,xo.medium,xo.large,xo.xlargeare the types used by exogeni. Note that they map to the “size” of the VM.docker-containeris used by the ilab.t docker AM.
The exclusive attribute is always true for bare metal hardware, since you always get exclusive access to it.
Example:
<node client_id="node0" exclusive="true" component_manager_id="urn:publicid:IDN+wall2.ilabt.iminds.be+authority+cm">
    <sliver_type name="raw-pc"/>
</node>
For VMs, the user can specify the node exclusive attribute of the node to be either false or true. exclusive="false" means that other users can get a VM hosted on the same physical machine. exlusive="true" means that ohter users can not get a VM hosted at the same physical machine. For most cases with VMs or containers, exclusive="false" is always used.
Example:
<node client_id="node1" exclusive="false" component_manager_id="urn:publicid:IDN+wall2.ilabt.iminds.be+authority+cm">
    <sliver_type name="default-vm"/>
</node>
A request with exclusive="false" for a node where that is not supported by the testbed, should not result in a failure. The testbed should just change it to true in the manifest. However, a request for exlusive="true" for a node for which the testbed does not support it, should result in an error.
In the advertisment RSpec, the AM needs to list each allowed sliver_type for each node. The exclusive attribute takes a different meaning in the advertisement. exclusive="false" means that a request may never request exclusive access to a node. exlusive="true" means a request may request exclusive access.
RSpec basics: Disk Images
Disk images are added as part of a sliver type, because they can differ depending on sliver type.
In an advertisment RSpec, the AM should list all possible disk images within each sliver element of each node. Note that this means there will be a lot of repetition! (That is not a nice feature of the “geni version 3 rspec” schema, but there is no way around it.)
It is not required that an AM supports this functionality. In case an AM does not support it, it should fail with the correct error when a disk_image is specified in a request RSpec.
Example in a request:
<node client_id="node0" exclusive="true" component_manager_id="urn:publicid:IDN+wall2.ilabt.iminds.be+authority+cm">
    <sliver_type name="raw-pc">
        <disk_image name="urn:publicid:IDN+wall2.ilabt.iminds.be+image+emulab-ops:CENTOS65-64-STD-BIG2"/>
    </sliver_type>
</node>
In practice, the name field of a disk image contains an URN. jFed currently can only handle disk images containing an URN. The authority part of the URN should refer to the testbed, the type part of the URN is always “image”.
Note that the geni version 3 rspec schema allows the following optional attributes to be specified in the advertisement RSpec (they are allowed in the request RSpec, but don’t make much sense there):
os: The name of the OSversion: The version of the disk image, or OS (not really specified anywhere which one).description: A textual description of the disk image. You can put anything that is helpfull for users here.url: TODO: emulab supports disk images from other testbeds. This is not yet explained here.
To have jFed support disk images for a testbed, the jFed central config needs to be updated. Contact the jFed developers for this.
RSpec basics: Specific nodes
Optionally, an AM can allow (or require) requests that demand a specific piece of hardware. This is done using the component_id attribute. If this attribute is not specified, the testbed has to either fail the request (informing the user that component_id is mandatory), or pick a suitable piece of hardware automatically.
Note that the advertisement RSpec can contain an additional component_name attribute, which has a nickname for a node. This is typically the same as the last part of the component_id. This component_name attribute should NOT be used in a request RSpec. An AM should not require it, nor use it to assign specific nodes, only component_id should be used for that.
Example in a request:
<node client_id="node0" exclusive="true"
      component_manager_id="urn:publicid:IDN+wall2.ilabt.iminds.be+authority+cm"
      component_id="urn:publicid:IDN+wall2.ilabt.iminds.be+node+n082-01">
  <sliver_type name="raw-pc"/>
</node>
RSpec basics: Hardware type
Optionally, an AM can allow (or require) requests that demand a specific type of hardware, but that do not specify the specific piece of hardware. This is done using the hardware_type element. If this element is specified and no component_id is specified, the testbed has to either fail the request (informing the user that hardware_type is not supported), or pick a suitable piece of hardware, matching the type, automatically.
Note
It is important to unserstand the difference between hardware_type and sliver_type.
Example in a request:
<node client_id="node1" exclusive="true" component_manager_id="urn:publicid:IDN+wall2.ilabt.iminds.be+authority+cm">
  <sliver_type name="raw-pc"/>
  <hardware_type name="gpunode"/>
</node>
In an advertisement RSpec, the hardware_type should be specified, if this feature is supported in the request RSpec. Note that it is allowed to specify multiple hardware_type elements in an advertisement RSpec. It is ok to do so if that makes sense for your AM. But if possible, it’s nice to keep it simple and specify only 1 hardware_type per node.
Advertisement Examples: Bare metal access
Scenario: You want to give users “bare metal access” to nodes. This means they get full access, not access to a VM or container. The user is the only one getting access to the machine, typically as “root” or as a user with sudo privilegdes.
Advertisment RSpec example:
<node component_id="urn:publicid:IDN+example.com+node+pi1" component_manager_id="urn:publicid:IDN+example.com+authority+am" component_name="pi1" exclusive="true">
    <sliver_type name="raw-pc">
        <disk_image name="urn:publicid:IDN+example.com+image+raspbian"/>
        <disk_image name="urn:publicid:IDN+example.com+image+arch"/>
    </sliver_type>
    <hardware_type name="pc-raspberry-pi"/>
    <available now="true"/>
    <location country="NU" latitude="0.0" longitude="0.0"/>
</node>
Things to note:
exclusiveis true, because users get full acesss to the node.sliver_typeisraw-pc. This is the typical sliver type used to represent bare metal access to “PC like” hardware.hardware_typeispc-raspberry-pi. The hardware type name should be something that identifies the type of hardware to a user. In this case, the hardware is a Raspberry Pi computer. Another example are thepcgen01,pcgen02andpcgen03types, which are used on the imec virtual wall, and means “A PC of generation 1, 2 or 3”, users can then look up in the testbed documentation what the full specifications of each “generation” is.available now="true"means that this hardware is currently available.locationis used to specify the location of the node.countryis the country code, in this case, and invalid code, refering to “null island”. Off course you should use the real coordinate of your testbed node here. It is OK to use the same coordinate for all testbed nodes.
Advertisement Examples: Simple VM’s
This example shows how you can offer a single type of VM.
TODO: explain
Advertisment RSpec example:
<node xmlns:emulab="http://www.protogeni.net/resources/rspec/ext/emulab/1" component_id="urn:publicid:IDN+example.com+node+vmhost1" component_manager_id="urn:publicid:IDN+example.com+authority+am" component_name="vmhost1" exclusive="false" >
    <sliver_type name="xen-vm">
        <disk_image name="urn:publicid:IDN+example.con+image+ubuntu14"/>
        <disk_image name="urn:publicid:IDN+example.con+image+ubuntu16"/>
    </sliver_type>
    <hardware_type name="pc-vmhost">
        <emulab:node_type type_slots="20"/>
    </hardware_type>
    <available now="true"/>
    <location country="NU" latitude="0.0" longitude="0.0"/>
</node>
Matching Request RSpec example:
<rspec xmlns="http://www.geni.net/resources/rspec/3" type="request" xmlns:jfed="http://jfed.iminds.be/rspec/ext/jfed/1">
    <node client_id="vm-one" component_manager_id="urn:publicid:IDN+example.com+authority+am" exclusive="false">
        <sliver_type name="xen-vm">
            <disk_image name="urn:publicid:IDN+example.con+image+ubuntu16"/>
        </sliver_type>
        <location xmlns="http://jfed.iminds.be/rspec/ext/jfed/1" x="100.0" y="100.0"/>
    </node>
    <node client_id="vm-two" component_manager_id="urn:publicid:IDN+example.com+authority+am" exclusive="false">
        <sliver_type name="xen-vm">
            <disk_image name="urn:publicid:IDN+example.con+image+ubuntu16"/>
        </sliver_type>
        <jfed:location x="100.0" y="100.0"/>
    </node>
</rspec>
Advertisement Examples: Complex VM’s: multiple sizes
This example shows how you can offer different “sizes” of VM, where each size has a different number of CPU cores, memory, etc.
Each size will typically take a different number of type_slots, for example, a “tiny-vm” will take 1 type slot, and a “large-vm” will take 5 type slots.
TODO: explain more
Advertisment RSpec example:
<node xmlns:emulab="http://www.protogeni.net/resources/rspec/ext/emulab/1" component_id="urn:publicid:IDN+example.com+node+vmhost1" component_manager_id="urn:publicid:IDN+example.com+authority+am" component_name="vmhost1" exclusive="false" >
    <sliver_type name="vm-tiny">
        <disk_image name="urn:publicid:IDN+example.con+image+ubuntu14"/>
        <disk_image name="urn:publicid:IDN+example.con+image+ubuntu16"/>
    </sliver_type>
    <sliver_type name="vm-medium">
        <disk_image name="urn:publicid:IDN+example.con+image+ubuntu14"/>
        <disk_image name="urn:publicid:IDN+example.con+image+ubuntu16"/>
    </sliver_type>
    <sliver_type name="vm-big">
        <disk_image name="urn:publicid:IDN+example.con+image+ubuntu14"/>
        <disk_image name="urn:publicid:IDN+example.con+image+ubuntu16"/>
    </sliver_type>
    <hardware_type name="pc-vmhost">
        <emulab:node_type type_slots="30"/>
    </hardware_type>
    <available now="true"/>
    <location country="NU" latitude="0.0" longitude="0.0"/>
</node>
Matching Request RSpec example:
<rspec xmlns="http://www.geni.net/resources/rspec/3" type="request" xmlns:jfed="http://jfed.iminds.be/rspec/ext/jfed/1">
    <node client_id="vm-one" component_manager_id="urn:publicid:IDN+example.com+authority+am" exclusive="false">
        <sliver_type name="vm-tiny">
            <disk_image name="urn:publicid:IDN+example.con+image+ubuntu16"/>
        </sliver_type>
        <location xmlns="http://jfed.iminds.be/rspec/ext/jfed/1" x="100.0" y="100.0"/>
    </node>
    <node client_id="vm-two" component_manager_id="urn:publicid:IDN+example.com+authority+am" exclusive="false">
        <sliver_type name="vm-tiny">
            <disk_image name="urn:publicid:IDN+example.con+image+ubuntu16"/>
        </sliver_type>
        <jfed:location x="100.0" y="100.0"/>
    </node>
</rspec>
Advertisement Examples: Specialised hardware connected to single VM box
TODO: explain
<node component_id="urn:publicid:IDN+example.com+node+usrp2" component_manager_id="urn:publicid:IDN+example.com+authority+am" component_name="usrp2" exclusive="true">
    <sliver_type name="usrp-vm">
        <disk_image name="urn:publicid:IDN+example.com+image+plain"/>
        <disk_image name="urn:publicid:IDN+example.com+image+gnuradio"/>
    </sliver_type>
    <hardware_type name="pc-usrp"/>
    <available now="true"/>
    <location country="NU" latitude="0.0" longitude="0.0"/>
</node>
Advertisement Examples: Combining Bare metal and VMs on a single node
TODO: explain
Hint: look at emulab advertisement RSpecs.
Note that not all possible scenarios can be expressed in this format. Also, for some scenarios that can be expressed, not all info is specified. RSpec has grown historically, and does not offer every flexibility.
This is a complex case. It’s good to note that each sliver_type works with one or more hardware_types, and will not work with certain other hardware_types. This info is not specified anywhere.
In the example below, the hardware_type “pc-gen1” and “pc-gen2” have a sliver_type “raw-pc”, and the hardware_type “pc-vmhost” has sliver_type “small-xen-vm” and “big-xen-vm” (these match resources allocated to the VM, such as cores and memory. As an example, “small-xen-vm” takes 2 type slots, and “big-xen-vm” takes 5 type slots).
Example advertisement:
<node xmlns:emulab="http://www.protogeni.net/resources/rspec/ext/emulab/1" component_id="urn:publicid:IDN+example.com+node+nodeA" component_manager_id="urn:publicid:IDN+example.com+authority+am" component_name="nodeA" exclusive="true" >
    <sliver_type name="small-xen-vm">
        <disk_image name="urn:publicid:IDN+example.con+image+ubuntu14"/>
        <disk_image name="urn:publicid:IDN+example.con+image+ubuntu16"/>
    </sliver_type>
    <sliver_type name="big-xen-vm">
        <disk_image name="urn:publicid:IDN+example.con+image+ubuntu14"/>
        <disk_image name="urn:publicid:IDN+example.con+image+ubuntu16"/>
    </sliver_type>
    <sliver_type name="raw-pc">
        <disk_image name="urn:publicid:IDN+example.con+image+ubuntu16"/>
        <disk_image name="urn:publicid:IDN+example.com+image+arch"/>
    </sliver_type>
    <hardware_type name="pc-vmhost">
        <emulab:node_type type_slots="20"/>
    </hardware_type>
    <hardware_type name="pc-gen2">
        <emulab:node_type type_slots="1"/>
    </hardware_type>
    <available now="true"/>
    <location country="NU" latitude="0.0" longitude="0.0"/>
</node>
Example request for any bare metal node of type “pc-gen2” (there could be bare metal nodes of type “pc-gen1” offering sliver_type “raw-pc” as well):
<node client_id="gen2nodeA" component_manager_id="urn:publicid:IDN+example.com+authority+am" exclusive="true">
    <sliver_type name="raw-pc">
        <disk_image name="urn:publicid:IDN+example.com+image+arch"/>
    </sliver_type>
    <hardware_type name="pc-gen2"/>
</node>
Example request for bare metal access to “nodeA”:
<node client_id="nodeA" component_id="urn:publicid:IDN+example.com+node+nodeA" component_manager_id="urn:publicid:IDN+example.com+authority+am" exclusive="true">
    <sliver_type name="raw-pc">
        <disk_image name="urn:publicid:IDN+example.com+image+arch"/>
    </sliver_type>
</node>
Example request for a “big” VM on any VM node:
<node client_id="vm1" component_manager_id="urn:publicid:IDN+example.com+authority+am" exclusive="false">
    <sliver_type name="big-xen-vm">
        <disk_image name="urn:publicid:IDN+example.con+image+ubuntu16"/>
    </sliver_type>
</node>
Example request for 2 VM nodes on “nodeA”, with exclusive hardware access:
<node client_id="small-vm-a" component_id="urn:publicid:IDN+example.com+node+nodeA" component_manager_id="urn:publicid:IDN+example.com+authority+am" exclusive="true">
    <sliver_type name="small-xen-vm">
        <disk_image name="urn:publicid:IDN+example.con+image+ubuntu16"/>
    </sliver_type>
</node>
<node client_id="big-vm-b" component_id="urn:publicid:IDN+example.com+node+nodeA" component_manager_id="urn:publicid:IDN+example.com+authority+am" exclusive="true">
    <sliver_type name="big-xen-vm">
        <disk_image name="urn:publicid:IDN+example.con+image+ubuntu16"/>
    </sliver_type>
</node>
Request RSpec
This section describes which request RSpec features you can use for your AM. jFed will automatically offer a lot of functionality when this is done correctly.
Some things to take into account in request RSpecs:
- Each node will have exactly one sliver_type in a request.
- Each sliver_type will have zero or one
disk_imageelements. If your testbed requiresdisk_imageor does not support it, it should handle bad requests RSpecs with the correct error. - The
exclusiveelement is specified for each node in the request. Your testbed should check if the specified value (in combination with thesliver_type) is supported. and return the correct error if not. - The request RSpec might contain links that have a
component_managerelement that maches your AM. If you AM does not support links, it should return the correct error.
Some information will be in a request RSpec, that needs to be ignored and copied to the manifest RSpec unaltered. This is important to do correctly.
- A request RSpec can contain nodes that have a
component_manager_idset to a different AM. You need to ignore these nodes, and copy them to the manifest RSpec unaltered. - A request RSpec can contain links that do not have a
component_managermatching your AM (links have multiple component_manager_id elements!). You need to ignore these links, and copy them to the manifest RSpec unaltered. - A request RSpec can contain XML extensions in nodes, links, services, or directly in the rspec element. Some of these your AM will not know. It has to ignore these, and preferably also pass them unaltered to the manifest RSpec.
Example request:
<rspec xmlns="http://www.geni.net/resources/rspec/3" type="request" generated_by="jFed RSpec Editor" generated="2019-02-05T07:52:31.901+01:00" xmlns:xsi="http://www.w3.org/2001/XMLSchema-instance" xsi:schemaLocation="http://www.geni.net/resources/rspec/3 http://www.geni.net/resources/rspec/3/request.xsd ">
  <node client_id="node0" exclusive="true" component_manager_id="urn:publicid:IDN+wall2.ilabt.iminds.be+authority+cm">
    <sliver_type name="raw-pc"/>
    <location xmlns="http://jfed.iminds.be/rspec/ext/jfed/1" x="100.0" y="100.0"/>
  </node>
  <node client_id="node1" exclusive="false" component_manager_id="urn:publicid:IDN+wall1.ilabt.iminds.be+authority+cm">
    <sliver_type name="xen-vm"/>
    <location xmlns="http://jfed.iminds.be/rspec/ext/jfed/1" x="200.0" y="100.0"/>
  </node>
</rspec>
Example manifest from wall2:
<rspec xmlns="http://www.geni.net/resources/rspec/3" type="manifest" xmlns:xsi="http://www.w3.org/2001/XMLSchema-instance" xsi:schemaLocation="http://www.geni.net/resources/rspec/3 http://www.geni.net/resources/rspec/3/request.xsd ">
    <node client_id="node0" exclusive="true" component_manager_id="urn:publicid:IDN+wall2.ilabt.iminds.be+authority+cm" component_id="urn:publicid:IDN+wall2.ilabt.iminds.be+node+n088-77" sliver_id="urn:publicid:IDN+wall2.ilabt.iminds.be+sliver+145278">
        <sliver_type name="raw-pc">
            <disk_image name="urn:publicid:IDN+wall2.ilabt.iminds.be+image+emulab-ops:UBUNTU18-64-STD"/>
        </sliver_type>
        <services>
            <login authentication="ssh-keys" hostname="n088-77.wall2.ilabt.iminds.be" port="22" username="myuser"/>
            <login authentication="ssh-keys" hostname="n088-77.wall2.ilabt.iminds.be" port="22" username="otherusr"/>
        </services>
        <location xmlns="http://jfed.iminds.be/rspec/ext/jfed/1" x="100.0" y="100.0"/>
    </node>
    <node client_id="node1" exclusive="false" component_manager_id="urn:publicid:IDN+wall1.ilabt.iminds.be+authority+cm">
      <sliver_type name="xen-vm"/>
      <location xmlns="http://jfed.iminds.be/rspec/ext/jfed/1" x="200.0" y="100.0"/>
    </node>
</rspec>
Note that the node node1 is copied unaltered to the manifest by the wall2 AM. The element <location> in node0 is also copied unaltered to the manifest.
Manifest RSpec
Todo
this section needs to be written
Special case: SSH login through SSH proxy
Not all testbeds offer direct SSH access to all nodes. A typical solution is to offer access through an SSH proxy (sometimes called “skip host”).
To login to the requested resources, a user needs to forward the SSH connection over a seperate SSH connection to the proxy node (so the connection becomes SSH-over-SSH).
jFed supports a manifest extension to describe this scenario, and will setup the SSH-over-SSH connection transparently for the users. More information about this manifest extension can be found here: https://fed4fire-testbeds.ilabt.iminds.be/asciidoc/rspec.html#_ssh_proxy_manifest_rspec_extension
Note: jFed also offers SSH-over-SSH using the central jFed proxy. This is needed for many users to escape local firewalls. SSH-over-SSH-over-SSH is currently not supported, so testbed specific SSH proxies cannot be used in combination with the central jFed proxy. (It might be possible for users to set this up manually on linux.)
Special case: Indirect testbed resource access
Not all testbeds offer resources that can be loggin in to using SSH (directly or through a proxy). Some testbeds require you to login (typically using SSH) to a host seperate from the requested resources, on which commands can be executed to manage and use the testbed resources. We will call this host the “management node” in the rest of this section.
There are a few options here:
- It might be required by users to explicitly request a management node in the request RSpec.
- The testbed might have a dedicated shared management host, which all users share. In this case, users will not specify the management node in the request RSpec. The testbed will add the info about the management node in the manifest RSpec. The testbed will needs to manage users accounts and SSH access to them to allow users to login to the management node.
- The testbed might automatically add a management node to each experiment. This case is similar to the case with a dedicated shared management host: it is not in request RSpec, but it is added to the manifest RSpec. However, in this case, an exclusive management host is setup for each experiment. Often, a VM or docker container is used as management node in this scenario.
On some testbeds, a dedicated shared management host or a exclusive management host is also used as SSH proxy to reach the nodes. This makes sense if it is required to somehow initialise the requested nodes from the management nodes, but once they are ready, SSH login is possible.
Note that in all these scenario’s, it is very important to have good documentation available for the experimenters.
Advertisement RSpec extension: Hardware information
jFed supports an advertisement RSpec extension to specify info about each hardware type. This is used to show more information about hardware types in the jFed experimenter GUI.
Specification and Grid5000 example: https://grid5000.gitlabpages.inria.fr/gcf-grid5000-plugin/hwinfo.html
Wall2 example:
<hardware_type_info xmlns="https://doc.fed4fire.eu/rspec/ext/hwinfo/1">
    <overview media-type="text/plain">Test</overview>
    <overview media-type="text/html" href="https://doc.ilabt.imec.be/ilabt-documentation/virtualwallfacility.html#virtual-wall-2"/>
    <hardware_type name="pcgen03-1p" hrn="Generation 3 (1 iface)">
      <info media-type="text/plain">2x Hexacore Intel E5645 (2.4GHz) CPU, 24GB RAM, 1x 250GB harddisk, 1 gigabit nic</info>
    </hardware_type>
   ...
</hardware_type_info>
Todo
this section needs to be extended with an screenshot inside jFed
Todo
this section needs to be extended
Stitching details for AM developers
Note
This documentation has moved to https://doc.fed4fire.eu/#testbed-owner-documentation
General
“Stitching” and “Dedicated Ext. Network Connection” are both methods to connect testbeds using dedicated physical links. Thus a fixed delay and bandwitdh is available between nodes.
An alternative to both is to connect nodes over the internet, but this only offers “best-effort” delay and bandwidth (this typically uses “virtual links”, created gre-tunnels or other methods).
“Real” Stitching: automated multiple hops and VLAN translation
Stiching is used to create links between different AMs and testbeds. The user just draws a link between 2 nodes of a different testbed in the jfed experimenter GUI. Behind the scenes, VLAN connections are setup over dedicated link(s) between the different testbeds. Possibly, the testbeds are not directly connected, and a few hops are needed to make the connection. On each of these hops, VLAN translation may be required to change to the VLAN used in the next link. Each involved AM must keep track of the used VLANs on each external link.
The user does not need to know any of these details, but the client software needs to send VLAN info to each VLAN, and work as an intermediate to find a working configuration.
To start this setup procedure, the client first needs to contact the SCS: the “Stitching Computation Service”. This service has info on the interconnections between all AMs, so it can find a path from AM to AM, passing though the needed AMs on the way. The client needs receives info from the SCS about which AMs to contact in which order.
The SCS will then request the advertisement RSpec of the AMs periodically. To allow stitching, the advertisement RSpec must contain info about external links.
At imec/iMinds we run an SCS at http://scs.atlantis.ugent.be:8081/geni/xmlrpc There is also a geni SCS. The SCS’s must be configured with info about the AMs that offer external links.
Stitching is a very complicated topic. Here are a few points that might be good to know:
The SCS is needed, because in some cases, a stitched link that goes from one AM to another, will actually cross one or more other AMs. Only the central SCS can know about this topology, as it talks to all involved AMs. It is this topology information that the SCS will send to clients.
You can run your own SCS, and jFed can be configured to use this specific SCS for specific testbeds. However, it’s probably easier and better in the long run if we just add the info to our SCS.
The advertisement RSpec contain extra information in related to stitching. This information is in a seperate namespace. See the example below.
The SCS gets a request RSpec as input, and appends stitching information to it. This request RSpec is then sent to each involved AM.
The manifest RSpec contains cross-AM info about the current stitching setup.
There is a special error code and message that AMs should return for failures related VLANs not available for stitching.
There are 2 important features that improve stitching setup time:
- Support for “any” VLAN in the request RSpec: instead of specifying a VLAN, the client is allowed to set the special keywork “any” instead, and let the AM choose
- Up to date advertisement RSpecs: The advertisement RSpec always contains up to date info on which VLANs are currently available.
The client code in the jFed experiment GUI that manages stiching is very complex, to handle all cases. The client must “negotiate” between the different AMs until a stitching configuration ( = which VLANs on which AM) is found that works on all AMs.
Below is an extract from the wall2 stitching info in the advertisment request:
<stitching lastUpdateTime="2017-02-15T06:19:30Z" xmlns="http://hpn.east.isi.edu/rspec/ext/stitch/0.1/">
   <aggregate
       id="urn:publicid:IDN+wall2.ilabt.iminds.be+authority+cm" url="https://www.wall2.ilabt.iminds.be:12369/protogeni/xmlrpc/am">
       <aggregatetype>protogeni</aggregatetype>
       <stitchingmode>chainANDTree</stitchingmode>
       <scheduledservices>false</scheduledservices>
       <negotiatedservices>false</negotiatedservices>
       <lifetime id="life">
           <start type="time">2017-02-15T06:19:30Z</start>
           <end type="time">2017-02-15T06:19:30Z</end>
       </lifetime>
       <node id="urn:publicid:IDN+wall2.ilabt.iminds.be+node+c300b">
           <port id="urn:publicid:IDN+wall2.ilabt.iminds.be+stitchport+c300b:4.2">
               <capacity>1000000</capacity>
               <maximumReservableCapacity>1000000</maximumReservableCapacity>
               <minimumReservableCapacity>1000</minimumReservableCapacity>
               <granularity>1</granularity>
               <link id="urn:publicid:IDN+wall2.ilabt.iminds.be+interface+c300b:4.2">
                   <remoteLinkId>urn:publicid:IDN+wall1.ilabt.iminds.be+interface+c300a:4.1</remoteLinkId>
                   <trafficEngineeringMetric>10</trafficEngineeringMetric>
                   <capacity>1000000</capacity>
                   <maximumReservableCapacity>1000000</maximumReservableCapacity>
                   <minimumReservableCapacity>1000</minimumReservableCapacity>
                   <granularity>1</granularity>
                   <switchingCapabilityDescriptor>
                       <switchingcapType>l2sc</switchingcapType>
                       <encodingType>ethernet</encodingType>
                       <switchingCapabilitySpecificInfo>
                           <switchingCapabilitySpecificInfo_L2sc>
                               <interfaceMTU>1500</interfaceMTU>
                               <vlanRangeAvailability>197,300-349,750-1000</vlanRangeAvailability>
                               <vlanTranslation>false</vlanTranslation>
                           </switchingCapabilitySpecificInfo_L2sc>
                       </switchingCapabilitySpecificInfo>
                   </switchingCapabilityDescriptor>
               </link>
           </port>
            ....
Stitching alternative: Dedicated Ext. Network Connection
If you only need single hop stitching, you can make things easy, by using links to fake nodes, which represent certain VLANs. The disadvantage is that this is less transparant for end users. It is however, much easier to implement on the AM.
In the jFed GUI, this is implemented with the “Dedicated Ext. Network Connection” icon. You drag in this icon, and then make a link between a real node and this “virtual” node.
TODO: add an example of this.
Stitching alternative: “tunnels” over internet using link_type
In this scenario, there are no dedicated links between testbeds. Instead, virtual links will be set up in software, that will run over the internet. Of course, this implies best-effort bandwidth and delay, instead of garuanteed bandwidth and delay.
These links can typically be used within a testbed as between testbeds. (Using them within testbeds is useful if the testbed doesn’t support dedicated links between nodes.)
In this scenario, you draw a link in jFed and change it’s type to match the type of virtual link.
This link type is set using the <link_type> element in the RSpecs <link>.
Currently, the know link types are:
- Regular link: no link type, or
<link_type name="lan"/>(between nodes of the same testbed) - Stiched link: no link type, or
<link_type name="lan"/>(between nodes of the different testbeds) - GRE:
<link_type name="gre-tunnel"/> - EGRE:
<link_type name="egre-tunnel"/> - Proposed: VXLAN:
<link_type name="vxlan"/>
Example RSpec:
<?xml version='1.0'?>
<rspec xmlns="http://www.geni.net/resources/rspec/3" type="request" xmlns:xsi="http://www.w3.org/2001/XMLSchema-instance" xsi:schemaLocation="http://www.geni.net/resources/rspec/3 http://www.geni.net/resources/rspec/3/request.xsd ">
  <node client_id="node0" exclusive="true" component_manager_id="urn:publicid:IDN+testbed-a.example.com+authority+am">
    <sliver_type name="raw-pc"/>
    <interface client_id="node0:if0">
      <ip address="192.168.0.1" netmask="255.255.255.0" type="ipv4"/>
    </interface>
  </node>
  <node client_id="node1" exclusive="true" component_manager_id="urn:publicid:IDN+testbed-b.example.com+authority+am">
    <sliver_type name="raw-pc"/>
    <interface client_id="node1:if0">
      <ip address="192.168.0.2" netmask="255.255.255.0" type="ipv4"/>
    </interface>
  </node>
  <link client_id="link0">
    <component_manager name="urn:publicid:IDN+testbed-a.example.com+authority+am"/>
    <component_manager name="urn:publicid:IDN+testbed-b.example.com+authority+am"/>
    <interface_ref client_id="node0:if0"/>
    <interface_ref client_id="node1:if0"/>
    <link_type name="gre-tunnel"/>
    <property source_id="node0:if0" dest_id="node1:if0" capacity="10000"/>
    <property source_id="node1:if0" dest_id="node0:if0" capacity="10000"/>
  </link>
</rspec>